Tip #413

Open links from other apps on iOS in Vivaldi’s Private Tabs.

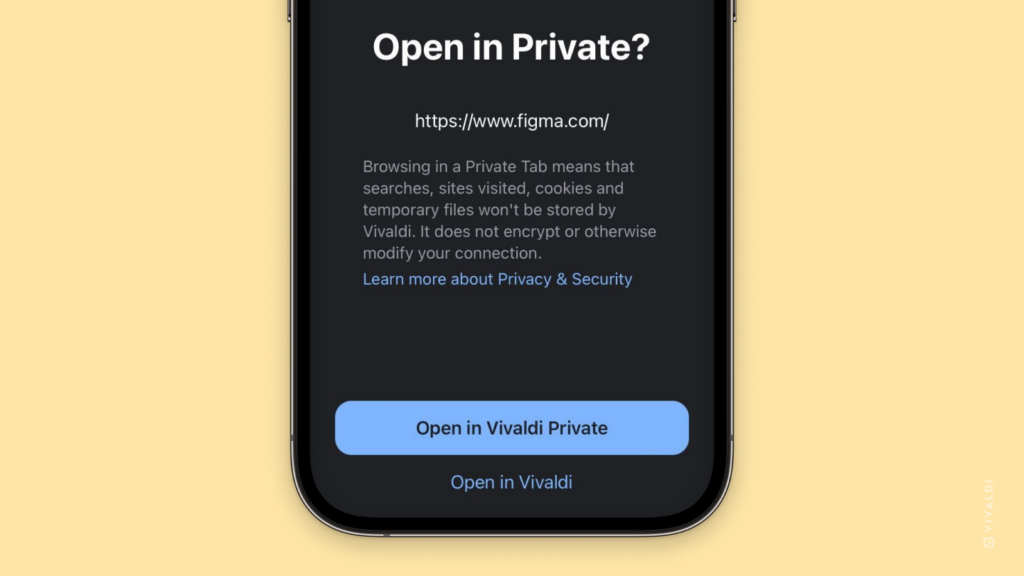
Do you prefer to browse in Private Tabs, but opening links from other apps always opens them among regular tabs? By making a quick setting change in Vivaldi on your iOS or iPad, you can be asked where you want to open the link every time an app wants to open one in Vivaldi.

To be prompted before opening a link in Vivaldi:

  1. Go to Settings > Privacy and security.
  2. Enable “Ask to Open Links from Other Apps in Private”.

Then, when you get the prompt you can decide whether to open the tab in a private or regular tab.

Tip #412

Selectively open Tabs from Saved Sessions.

Saving all your tabs as a session is a great way to return to what you were doing at a later date. But what if you need just one or a few of the tabs in the session and don’t want to restore all of them? Check out the instructions below.

To selectively open Tabs from a Saved Session:

  1. Open the Sessions Panel.
  2. Select the session that has the tab(s) you want to open.
  3. Click on “Edit Session” in the top right corner of the panel or right-click on the session and select “Edit / View Contents”.
  4. Select the tab(s) you want to open and right-click on it/them.
  5. Select “Open” or “Open Link”, followed by the opening location (e.g. New Background Tab), to open just the chosen one(s).

Tip #411

Take Vivaldi on the road with you by installing it in your car.

With more and more new cars coming out with a tablet-like screen on their center consoles, being able to access the web from them just makes sense, and the Android version of Vivaldi for Android Automotive OS is perfect for it.

You can watch videos together while you’re waiting for your car to charge for the next leg of the trip, look for dinner inspiration while waiting for the kids at the school parking lot, read the news while the spouse is shopping, and so much more. For safety reasons, the browser can only be used while the car is parked.

To install Vivaldi in your car:

  1. Open the app store in your car’s infotainment system.
  2. Search for Vivaldi Browser and open the app’s page.
  3. Click “Install”.
  4. Launch the app and start exploring!

Vivaldi is available in an increasing number of new car models by Polestar, Renault, Volvo, Mercedes, Volkswagen, Audi, Lynk&Co, Ford, Lincoln, and more.

Tip #410

Filter out text posts and view only shared media on someone’s Vivaldi Social / Mastodon profile.

Whether searching for a specific one or just interested in browsing all the images and videos someone has posted, there’s an easy way to view them in Vivaldi Social – in one place without text posts interfering.

All you need to do is go to the user’s profile and switch to the Media tab.

Tip #409

Access all websites you’ve visited in the past on any device by syncing your Vivaldi browser’s History.

Finding the link to an online store listing you came across while browsing on your phone or continuing the research you started on another computer is easier than ever with Vivaldi and its History Sync.

To sync History in Vivaldi:

  1. Go to Settings > Sync.
  2. Log in to your Vivaldi account.
  3. Enable either syncing of all data or make sure that at least syncing of History is enabled.

Repeat these steps on all desktop and mobile devices you use Vivaldi on.

Tip #408

Top or bottom? Decide where you want to have the Tab Bar and Adress Bar in Vivaldi on iOS.

Prefer your Address Bar and Tab Bar traditionally on top of the screen or at the bottom for easy one handed reach? Whatever your preference, we’ve got you covered.

To choose a location for the Tab and Address Bar:

  1. Go to Settings > Tabs.
  2. Select either Top or Bottom for the Address Bar Position.

Alternatively, long-press on the Address Bar and select “Move address bar to bottom/top” from the menu.

Tip #407

Add images to your Vivaldi.net blog posts with drag and drop.

Illustrations can add a lot to your blog content. When adding a new image to your post, you can always look for it through the File Manager/Finder dialog, but if you have the folder with images already open on the side, you can also just drag the image to your blog post.

To add images using drag and drop:

  1. In the post editor, add an Image or Gallery block.
  2. Place the browser and image folder windows side by side.
  3. Drag the file to the image block.

Tip #406

Divide events and tasks in your Vivaldi Calendar by category into separate calendars.

A calendar is vital for keeping up with a busy schedule. To make it easier to view and manage your events and tasks, you can create multiple calendars for various types of obligations in your Vivaldi Calendar. You can also assign a different color for each calendar to make the events stand out more.

To create a new calendar:

  1. Go to Settings > Calendar > Calendars.
  2. Click on + Add Calendar below the list of existing calendars.
  3. Select which account the calendar should belong to, give the calendar a name, choose a color and look over
  4. Click “Save” to create the new calendar.

Tip #405

Set different default Search Engines for Standard and Private Tabs in Vivaldi on Android.

You may be comfortable with one search engine for your everyday browsing but prefer a different search engine when you want stronger privacy. In Vivaldi on Android, like in Vivaldi on desktop and iOS (see Tip #378), you have the choice to set separate Search Engines as the default ones for Standard Tabs and Private Tabs.

To update the default search engines:

  1. Go to the Vivaldi menu > Settings > Search Engine.
  2. Select either “Standard Tab” or “Private Tab”.
  3. Tap on the search provider you want to set as the default one.
  4. Exit by going back to the main Settings menu using the  back arrow.

Tip #404

Make your Notes more readable with Markdown formatting.

Markdown is a simple markup language used to create rich text (e.g. HTML) with a plain text editor. It lets you add basic formatting to your text, using symbols known and accessible on all keyboards.

To use Markdown in Vivaldi Notes:

  1. Open the Notes Panel or Notes Manager and select or create a note.
  2. Make sure the Editor/Text view is enabled.
  3. Use the basic Markdown syntax to add headings, lists, bold text, etc.
  4. Switch to Markdown/Visual view to see the outcome.

Tip #403

Jump back in time by enabling Automatic Session Backups.

With Saved Sessions you can look up a single tab or restore your complete browsing session from a specific time in the past. You can save Sessions manually or have them be saved automatically once every hour.

To automatically back up all your open tabs as a Saved Session:

  1. Open the Sessions Panel.
  2. At the bottom of the panel, click on “Automatic Session Backup”.
  3. Select how many days worth of backups you want to keep:
    • Last day,
    • Last 3 days,
    • Last 5 days,
    • Last 30 days.
  4. Click “Save”.

Tip #402

Keep the most important tabs in Vivaldi on iOS within easy reach by pinning them.

Tabs can accumulate fast on mobile devices, to make sure you can always access your frequently used tabs quickly, you can pin them in place. In the Tab Switcher, Pinned Tabs will appear at the bottom, and on the Tab Bar, they’ll always be the first tabs on the left.

To pin a tab:

  1. Open the Tab Switcher.
  2. Long-press on the tab’s thumbnail.
  3. Select “Pin Tab”.

Tip #401

Re-draft a post on Vivaldi Social if you didn’t get it exactly right the first time.

Did you find a mistake in your Vivaldi Social post after publishing it? If it has already collected likes, boosts, and comments, it’s best to simply edit the post. But if you caught the error immediately after publishing, you can also delete and re-draft the post. That way you can take your time and the post will look fresh and clean after you publish it again.

To redo a post on Vivaldi Social:

  1. Click on the “More” menu button below the post.
  2. Select “Delete and re-draft”.
  3. The post will be moved back to the editor, where you can make the necessary edits.
  4. When ready, click “Publish” again.

Tip #400

Move tabs automatically to the correct Workspace with Workspaces Rules.

Workspaces are a way to organize your tabs where you can keep different tabs in different Workspaces, based on a topic or category. You might, for example, have a workspace for work, another for sports, and a third for travel.

To set up Workspace Rules:

  1. Go to Settings > Tabs > Workspaces.
  2. Click on Add New Workspace Rule.
  3. Set up the rule criteria.
  4. Select which workspace the tab should be moved to.