Tip #562

Switch between Reply and Reply All as you’re drafting the email message.

When you’re writing a reply email, do you sometimes reassess and decide that instead of replying to just the sender you should send the email to all recipients or vice versa? Luckily, in Vivaldi Mail, you don’t need to discard the draft and start again.

To switch between Reply and Reply All:

  1. Look to the “To” field in the email composer.
  2. Open the dropdown menu in front of the email address(es).
  3. Select Reply or Reply All/Reply List.
Vivaldi Mail's with an email draft open in the composer. An arrow is pointing at the dropdown menu where you can switch between Reply and Reply All.

Tip #561

Add hashtags to your Vivaldi Social posts to reach wider audiences.

In Tip #485 we suggested following hashtags to fill your timeline with content on topics that interest you. To make your own posts equally discoverable, make sure to include relevant hashtags within the post’s text or add them on a separate line at the end of the post.

To add a hashtag, type the # symbol followed by the word (without a space between), for example, . You can also use multiple words in a hashtag. In that case, write all the words together without spaces and make sure each word starts with a capital letter, for example, . Capitalizing makes multi-word hashtags easier to read.

A post including 3 hashtags being drafted on Vivaldi Social.

Tip #560

Change the active tab’s location on the Tab Bar with Keyboard Shortcuts.

If the order of tabs on the Tab Bar is important to you, then you might be familiar with dragging tabs to reorder them. But did you know that you can also use Keyboard Shortcuts to do it?

To move the active tab:

  • Backward, i.e. to the left or up use Ctrl/⌘ + Shift + Page ↑.
  • Forward, i.e to the right or down use Ctrl/⌘ + Shift + Page ↓.

You can also type “Move Active Tab Backward/Forward” in Quick Commands.

Tip #559

Create a shortcut for toggling dark mode for web pages on and off.

Through Settings > Appearance > Website Appearance, you can choose to display all websites in dark mode all the time. Even if a website hasn’t provided a dark option for their website, you can have Vivaldi create it for them by forcing dark mode to be used. But occasionally even dark mode lovers need to turn on the lights temporarily. That’s where shortcuts come in handy.

To toggle dark mode on and off with shortcuts:

Quick Commands

  1. Open Quick Commands.
  2. Type “Toggle Force a dark mode on all websites’.
  3. Press “Enter”.

For the following you first need to create the shortcut.

Keyboard Shortcuts

  1. Go to Settings > Keyboard > View.
  2. Find “Toggle Force a dark mode on all websites’.
  3. Focus on the input field next to it and press the key combination you want to use as the shortcut.

Mouse Gestures

  1. Go to Settings > Mouse > Gesture Mapping.
  2. Click on “New Gesture: and find “Toggle Force a dark mode on all websites”.
  3. Click “Next”.
  4. While holding down the left mouse buttton, draw the gesture in the red box.
  5. Click “Save Gesture”

Toolbar button

  1. Go to Settings > Quick Commands > Command Chains.
  2. Click on “Add Command Chain”.
  3. Give the chain a name.
  4. For Command 1 select “Toggle Force a dark mode on all websites”.
  5. Go to Vivaldi menu > View > Customize Toolbar.
  6. Select Command Chains from the dropdown menu.
  7. Drag the new chain to a toolbar of your choice.

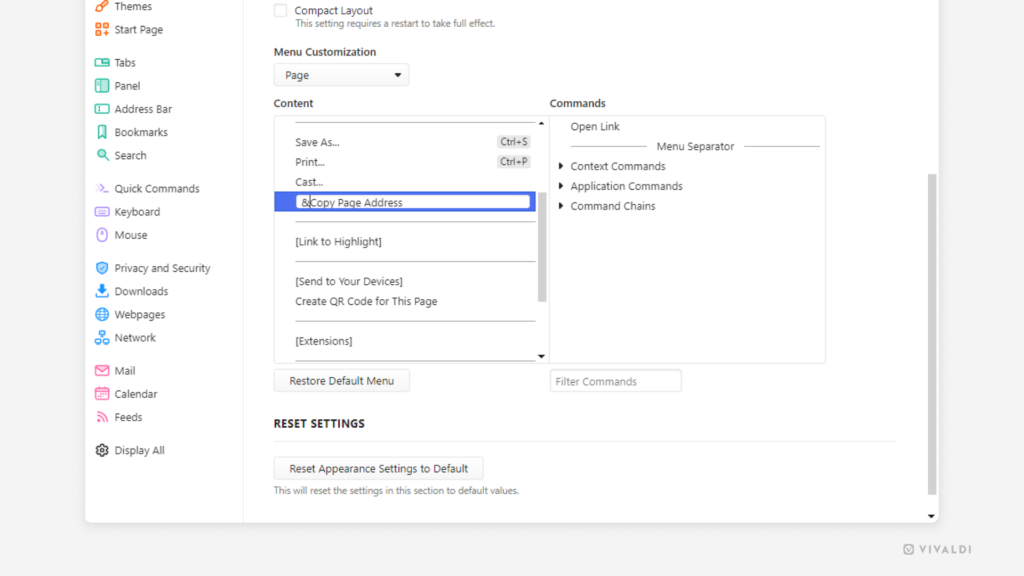
Context menu

  1. Go to Settings > Appearance > Menu.
  2. Select the menu you want to add the command to. For example Web Page > Page.
  3. From the Commands menu, search for “Toggle Force a dark mode on all websites”.
  4. Drag it to the Content column on the right.

Use the newly created shortcuts whenever you want to switch between light and dark mode.

Tip #558

Vivaldi’s Web Panels aren’t limited to just the mobile view. Learn how to get the desktop version.

Web Panels show you the mobile view of a web page. Some websites show pages on mobile much differently than on desktop or don’t even let you use some of the site’s functionality. Don’t let this stop you! Simply click on the “Switch to Desktop/Mobile View” button at the top of the panel and get to the content you’re after.

If things are a bit tight with the desktop view, check out Tip #15 and learn how to make the web panel wider without changing the size of the other Panels.

Vivaldi Browser with WhatsApp added as a Web Panel. An arrow is pointing at the button where desktop and mobile views can be switched.

Tip #557

Always know where you are by enabling full address display in Vivaldi on iOS.

By default, the Address Field only displays the domain you’re on (e.g. vivaldi.com) and you have to tap on the Address Field to see the full URL (e.g. https://vivaldi.com/blog/ios).

To see the full URL at all times:

  1. Go to Vivaldi menu button Vivaldi menu > Settings > Address Bar.
  2. Toggle on Show Full Address.
Two phones. One showing Address Bar settings page, the other a web page with the full URL visible in the Address Field.

Tip #556

Last tab closed – keep the window or say goodbye? You decide!

Vivaldi on desktop allows you to choose what happens when you close the last tab. If you often close all tabs to start fresh, you might want to keep the window open. If tend to close all tabs when you’re done browsing (at least in the current window), then closing the window as you close the last tab might suit you better.

To update the settings:

  1. Go to Settings > Tabs > Tab Handling.
  2. Toggle “Keep Window Open when Last Tab is Closed” on or off as you like.
Vivaldi Browser's tab settings. Arrow pointing at the option called "Keep Window Open when Last Tab is Closed".

Tip #555

Create new occurrences of the same event with copy and paste in Vivaldi Calendar.

Had a ton of fun with your friends recently and you’re planning to repeat the get-together? Awesome! When using the Vivaldi Calendar, it’s easy to duplicate events with all their details.

To make a copy of an event:

Option 1

  1. Right-click on the event and select “Copy”.
  2. Right-click on the date the event will take place on again and select “Paste”.

Option 2

  1. Select the event by navigating to it with your keyboard’s arrow keys.
  2. Use the keyboard shortcut Ctrl/⌘ + C.
  3. Move to the date the event will take place on again.
  4. Use the keyboard shortcut Ctrl/⌘ + V.

Tip #554

Save web pages for later by adding them to the Reading List in Vivaldi on iOS.

Vivaldi’s Reading List feature lets you save web pages with, for example, interesting articles in a list you can access from Vivaldi on all your devices with the help of Sync. Using the Reading List prevents endless tabs from accumulating on your Tab Bar and Bookmarks from being filled with entries you only need once.

To add the active tab to the Reading List.

  1. Open the  Vivaldi menu.
  2. Tap on “Add to Reading List”.

To add a link on a web page to the Reading List:

  1. Long press on the link to open the context menu.
  2. Select “Add to Reading List”.

You can open and manage pages in the Reading list from the  Vivaldi menu > Reading List.

Vivaldi on iOS with the app's main menu open. An arrow points to "Add to Reading List".

Tip #553

Make online shopping effortless by saving credit card information in Vivaldi.

If you’re frequently making purchases online, your transactions will go a lot faster when the browser can autofill your credit card details. To save a new payment method, simply click “Save” in the dialog when prompted during a purchase process.

To add a new card manually:

  1. Go to Settings > Privacy and Security > Payment Methods.
  2. Click “Add New Payment Method”.
  3. Enter your card’s details.
  4. Click “Save”.

Learn more about autofilling paymenth methods on Vivaldi Help.

Privacy and Security Settings in Vivaldi Browser showing the form for adding a new payment method.

Tip #552

Give tabs custom names and never lose sight of them again.

Whether the tab has an uninformative title, you have too many tabs with identical names or just wish to have more fun tab titles – whatever the reason, renaming tabs helps you keep tabs in your Vivaldi browser organized and easy to find.

To rename a tab:

  1. Right-click on the tab on the Tab Bar or in the Windows Panel and select Rename from the context menu.
    Alternatively, to rename the active tab, type “Rename Tab” in Quick Commands, or create a Keyboard Shortcut or Mouse Gesture for the action.
  2. Enter the new title.
  3. Press Enter or click somewhere else in the browser.

PS! It also works with Tab Stacks (see Tip #17).

Vivaldi Browser on desktop. A tab on the Tab Bar is being given a new name.

Tip #551

Share interesting posts from Vivaldi Social with people on other apps.

When you have the post with its comments open as a page in Vivaldi Social then it’s easy to copy the link from the Address Bar and share it. But when you’re casually browsing through your feeds, then opting for Vivaldi Social’s share option, which triggers the operating system’s share menu allows you to share content without losing your spot on the page.

To share posts from Vivaldi Social:

  1. Click on the 3 dot menu below the post.
  2. Select Share from the menu.
  3. Choose the app you want to share the post on.
  4. Follow the app’s directions.
Share menu that is displayed in Vivaldi on Android when sharing a post from Vivaldi Social.

Tip #550

Choose whether you want to see absolute or relative dates in Vivaldi Mail.

Like the browser, Vivaldi Mail can be customized to the smallest nuance. For example, you can display the received/sent date for all messages with an absolute timestamp (e.g. 26. August 2024) or use relative timestamps (e.g. Today, Friday) for more recent messages.

To make your choice:

  1. Go to Settings > Mail > Mail Settings > Mail View Layout.
  2. Enable/disable “Use Relative Dates”.

Tip #549

Enable History Manager’s day picker calendar to easily jump to the day you last remember visiting the page you’re looking for.

If the only useful thing you remember about a previously visited web page is the day you visited it, then with Vivaldi’s advanced History Manager it’ll be a breeze to find it again.

To find a page based on the visited date:

  1. Open the History Manager.
  2. Enable the day picker calendar from the top left corner of the page.
  3. In the new calendar column on the left, locate the day you remember visiting the web page.
  4. Click on the date to display the list of pages you visited on that day.
    We also recommend switching to day view from the top right corner for a better view.
  5. Scroll through your history and double-click on the entry to open the web page.
Vivaldi's History Manager. An arrow is pointing at the Day Picker Calendar toggle button.