Tip #116

Save frequently used replies as Responses to write emails faster in Vivaldi Webmail.

In case you often have to send the same message in Vivaldi Webmail, you can save the message text as a Response instead of typing it every time.

To add a new response:

  1. In Vivaldi Webmail, go to  Settings > Responses and click on  Create above the Responses editor.
  2. Give the new response a name and type the message text.
  3. Click Save.

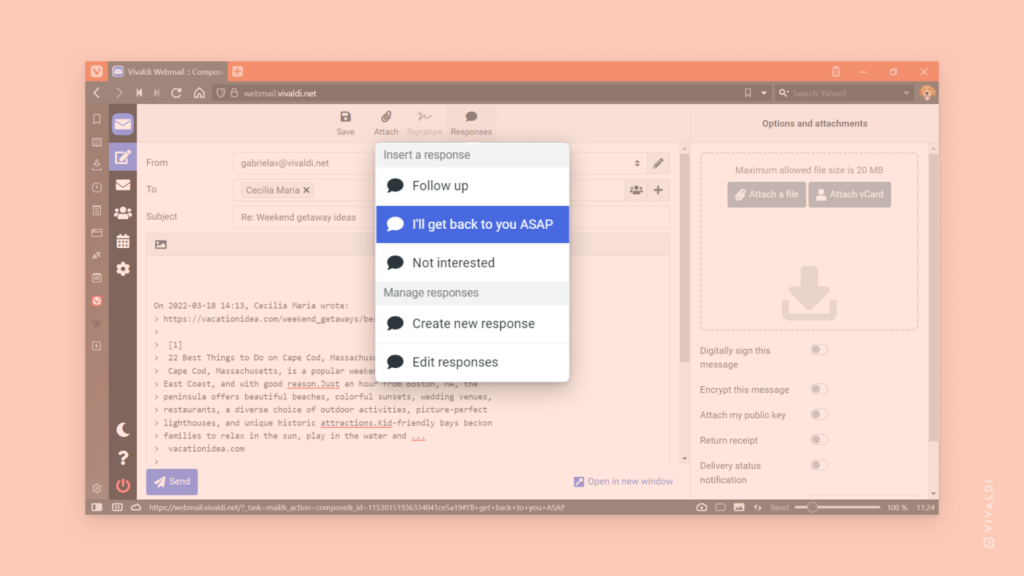
If you want to save a message you’ve written in the email composer as a response, click Responses on the menu above the email composer and select Create New Response.

To use a response:

  1. Click  Responses on the menu above the email composer.
  2. Select a saved response.

Tip #110

Choose which Forum categories you want to see in Unread and Recent.

The Vivaldi Forum is a busy place with discussions on lots of different topics. Not all of them may be relevant for you. For example, you’re probably not interested in topics in the local forum categories that have discussions in languages you don’t speak. If you wish, you can prevent topics from these categories from appearing in Recent and Unread pages of the Forum.

To unsubscribe (or re-subscribe) to a category:

  1. Navigate to the category on forum.vivaldi.net.
  2. From the menu above the list of topics (below subcategories, if there are any), click on the watched state menu.
  3. Select between:
    • Watching – shows topics both in Unread and Recent.
    • Not Watching – shows topics in Recent, but not in Unread.
    • Ignoring – doesn’t show topics neither in Unread nor Recent.

Unsubscribing from a category, unsubscribes you from all of its subcategories as well.

To get a complete overview of all topics and their watched states, go to https://forum.vivaldi.net/me/categories. There you can change the watched status for each category as well.

Vivaldi Forum's Watched Categories page with the options menu open for a category.

Tip #100

Select a different Theme for the Private Window.

Private Windows in Vivaldi have a different Theme from regular Windows to make it easier to see which one you’re using. You can set any theme from your Theme Library as the Private Window’s theme by:

  1. Going to Settings > Themes > Private Window Theme.
  2. Selecting a theme from the drop-down menu.

To add Themes created by the Vivaldi Community to your Theme Library, install them from themes.vivaldi.net.

Private and regular windows with different themes.
Private Window with a theme by かつの 悦夫えつお in the foreground and a regular window with a theme by TheJhonX in the background.

Tip #85

Get a hierarchical overview of your blog post by opening the List View.

When writing a blog post or creating a new page on your blog on Vivaldi.net, you can get a better overview of the blocks used in the blog and select blocks to work on from the List View.

To open List View, click on the List View button in the top left corner of the page.

To focus on a block and edit it, click on the block in the List View.

To close List View, click on the same List View button or on the Close button in the top right corner of the List View panel.

Tip #75

Create filters in Vivaldi Webmail to automatically organize your incoming messages.

If you receive a lot of messages, it helps to automate some of the organizational work. Creating Filters is a good way to move incoming messages to a different folder, add flags to them, reply with a predefined message and more.

To create Filters in Vivaldi Webmail:

  1. Log in to your Vivaldi account on webmail.vivaldi.net.
  2. Go to Settings > Filters.
  3. Click on Create on the top edge of the page, towards the right side.
  4. Give the filter a name, create the rule and set the action to be applied.
  5. Click Save.

On the screenshot below, you can see an example of a filter that moves messages containing the words “[Book Club]” in the subject to a folder titled Book Club.

Tip #70

Make the page of your choice Vivaldi Forum’s homepage.

If there’s a page you visit often on the Forum, consider making it your Forum homepage. Then, while logged in, whenever you click Home on the Forum menu or go to forum.vivaldi.net, you’ll be shown your chosen homepage.

To set a homepage:

  1. Log in to your Vivaldi account on forum.vivaldi.net.
  2. Go to forum.vivaldi.net/me/settings.
    Alternatively, click on your avatar in the top right corner and select Settings from the menu.
  3. In the Select a Homepage section, click on the dropdown menu and select your preferred page or set a custom one.
Forum homepage setting.

Tip #56

Click on the “moon” button to switch Vivaldi Webmail to dark mode.

You can access your Vivaldi email account on webmail.vivaldi.net, where Webmail’s Elastic (default) theme offers both light and dark versions.

Click on the moon icon at the bottom left corner of the page to switch to dark mode.

When dark mode is enabled, click on the sun to return to light mode.

Tip #27

Add high quality and free images to your Vivaldi blog using Instant Images.

A common way to enhance blog posts is to add images to it. When you host your blog on Vivaldi.net, you can easily find and insert images to the blog using the Instant Images plugin. With the plugin you can add images from Unsplash, Pixabay and Pexels directly to your blog’s Media Library, without having to download the files to your computer first.

To add a photo to your blog:

  1. In the post or page editor, add a new image or gallery block.
  2. Select Media Library and go to Instant Images tab.
  3. Search through the files from Unsplash, Pixabay and Pexels.
  4. When you’ve found one you like, click on the image.
  5. After it has been added to your library, click Select in the bottom right corner of the Media Library window to add it to the post/page.

You can also go to your blog’s Dashboard > Media > Instant Images, to browse and add images to your library.

Instant Images open in Vivaldi blog's post editor.

Tip #16

Subscribe to Forum Digest to get a selection of the latest discussions and notifications in your mailbox.

  1. Log in to your Vivaldi account.
  2. Go to https://forum.vivaldi.net/me/settings.
  3. Scroll down to the Email section.
  4. Choose how often you want to receive the Digest email. Choices are:
    • Daily,
    • Weekly,
    • Bi-weekly,
    • Monthly, and
    • Off i.e. disabled.
  5. Click Save Changes.

The emails will be sent at the chosen interval to your account’s recovery email address.

Tip #9

Change the look of Vivaldi’s user interface with custom CSS modifications.

If you’re familiar with reading and writing code, you can edit the desktop browser’s user interface with your own custom CSS modifications.

To get started:

  1. In vivaldi://experiments, enable “Allow for using CSS modifications”.
  2. In Settings > Appearance > Custom UI Modifications, select the folder where you’ll store all your custom CSS files.
  3. Restart the browser.

Now you can start inspecting the user interface using Developer Tools, write up your own CSS for the elements you want to change and see the browser transform to fit your preferences even more.

Vivaldi Community shares and works on modifications together on the Forum’s Modifications category. Feel free to ask assistance and share your work there.

Important! Code shared on the forum has not been reviewed by the Vivaldi Team. Which means that issues, including security issues, may be present.

If you don’t want to risk corrupting your main browser profile, test your modifications in a different User Profile or use a Standalone version of Vivaldi.

Tip #3

On Vivaldi Themes, click on “Download theme” to preview the theme before installing it.

When browsing themes.vivaldi.net for new Themes for your desktop Vivaldi browser, you can get a live preview of the theme by clicking “Download theme”.

Then you have 1 minute to see how the theme looks. Make sure to check the Start Page to see how the awesome background image looks behind your Speed Dials. Other places where the user interface colours are clearly visible are Panels, Settings, Mail, etc.

When you’re satisfied with the theme, click “Install” in the pop-up to add the theme to your Theme Library. If it’s not really what you were looking for, click “Cancel” or let the preview time run out.