Tip #142

Send emails as any of your mail accounts in Vivaldi Mail and swiftly change between them.

If you have set up multiple mail accounts in Vivaldi Mail, you can switch who you’re sending emails as in the message composer.

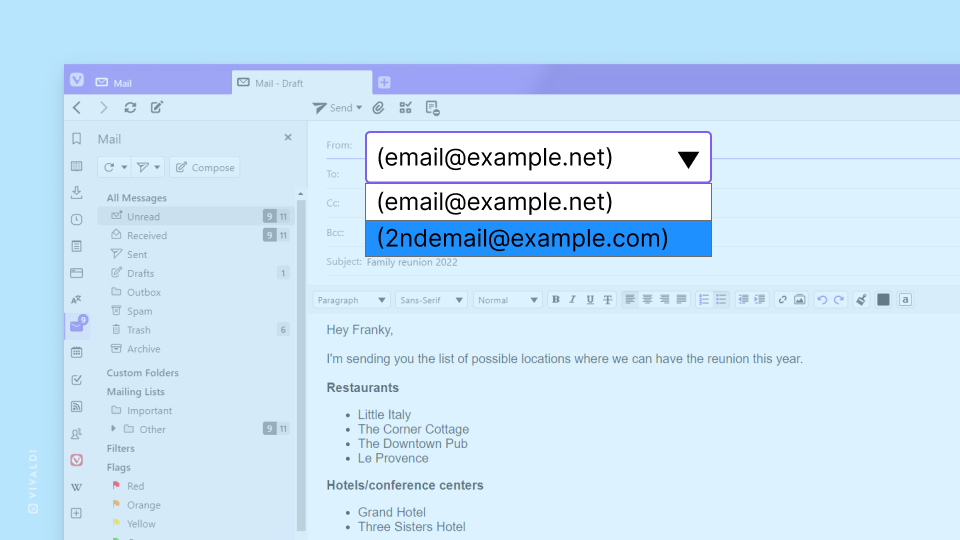
  1. Start writing a new email, either by composing a new message or by replying to/forwarding a received message.
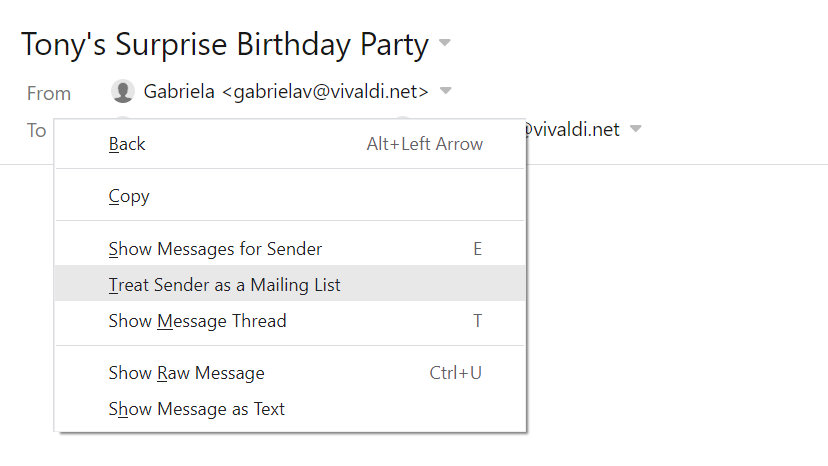
  2. In the email composer, in the sender section (From:), click on the displayed email.
  3. Select the email address you want to send the message as from the drop down menu.
Email composer in Vivaldi Mail with the menu to select the sender email address opened.

Tip #134

Mail list on the left and message on the right? Or mail list on top and message at the bottom? The choice is yours!

Vivaldi Mail offers 3 layouts for you to choose from. Opt for the one that supports your workflow best.

To switch layouts:

  1. Go to Settings > Mail > Mail Settings > Mail View Layout;
  2. Select between:
    1. Vertical,
    2. Vertical Wide, and
    3. Horizontal.

Alternatively, click on the Toggle View button in the top right corner of the Mail tab.

Vertical Mail View Layout
Vertical Wide Mail View Layout
Horizontal Mail View Layout

Tip #122

Switch between displaying Mail messages in HTML and Plain Text view.

Mail messages can come in either Plain text or HTML formatting. As the name indicates, messages sent in Plain Text display the email with just text without any additional formatting. Senders of HTML messages, on the other hand, can add all sorts of formatting (fonts, colors, images, etc.) to their message.

For HTML messages, Vivaldi Mail has an option to display them in Plain Text as well, removing all formatting and leaving only the core text.

To toggle the message view, either:

  • Click on the  /  Show Messages as Text/HTML button in the top right corner of the window.
  • Go to Settings > Mail > Mail Settings > Mail Rendering and choose your preferred view.
Vivaldi Mail with a message open in a tab and content displayed in HTML.
Message in HTML
Vivaldi Mail with a message open in a tab and content displayed in plain text.
Message in Plain Text

Tip #90

Add a custom signature to your email accounts in Vivaldi Mail.

A signature is a personalized section that is automatically added to the end of all messages you send from Vivaldi Mail (or other mail clients).

To add a signature in Vivaldi:

  1. Go to Settings > Mail > Mail Accounts.
  2. Select the account you want to add a signature for.
  3. In the Identity section, focus on the Signature field.
  4. Enter your custom signature.

If you need additional text formatting options or want to add an image to the signature, tick the box for Enable Rich Text and Images below Signature field.

To add an image, drag and drop the file to the signature field.

Tip #59

Enable “Download Messages for Offline Viewing and Searching” to access your mail without internet connection.

When you open a message in Vivaldi Mail it’s downloaded and a file for the message is created in your browser’s profile. Then you can open the email whether you have an internet connection or not. In addition, when searching, the downloaded message’s body is included in the searched content, improving search results.

To be able to view messages offline and include all message content in search even before you’ve opened the email, you only need to tick one box in Mail Settings.

To enable the setting:

  1. Go to Settings > Mail.
  2. Select an account you’ve added to Vivaldi Mail.
  3. In the Identity section, enable “Download Messages for Offline Viewing and Searching“.
Vivaldi Settings window, with focus on "Download Messages for Offline Viewing and Searching" setting.

Tip #52

Right-click on a contact in the Contacts Panel and select View All Messages to see all emails they’ve sent.

Contacts Panel has all contacts that you have sent emails to or who have emailed you. To see a list of all messages a saved contact has sent you:

  1. Right-click on their name/email in the Contacts Panel.
  2. Select View All Messages.

Mail tab with their email messages will open.

If you already have the Mail tab open and have found one email from the contact, select it and press E on your keyboard to see all their other emails.

Tip #49

Press K, G or M on your keyboard to mark messages in Vivaldi Mail and Feeds as read.

In Vivaldi Mail and Feeds, messages don’t get marked read automatically. You’ll actively have to tell the client that you’re done with the message. This way you don’t need to remember to mark a message unread again, in case you want to follow up on it later.

Messages can be marked as read using a button in the user interface, through menus or using shortcuts. Probably the fastest way to mark messages as read is to use a single key shortcut.

Before you start using the shortcuts, make sure you’ve enabled single key shortcuts for Mail, Calendar and Feeds in Settings > Keyboard > Keyboard Shortcuts.

To mark messages as read use one of the following keys:

  • K – mark message as read.
  • G – mark message as read and open the next unread message.
  • M – mark all messages in the message thread as read.

If you wish, you can edit the shortcuts in Settings > Keyboard > Keyboard Shortcuts > Mail.

Tip #45

Create a Mailing List from an email address for quick access to all emails from the sender.

When you often need to view emails from a specific sender, instead of searching for their emails or using the option “Show messages for Sender” every time, create a Mailing List with messages from the sender. Then you can easily open a list with all their messages from the Mail Panel.

To create a new mailing list:

  1. Open one of their messages.
  2. Right-click on the message header.
  3. Select Treat Sender as a Mailing List.

Alternatively:

  1. Right-click on one of their messages in the message list.
  2. Select Sender > Treat Sender as a Message List.

A folder with all their messages will be created in the Mail Panel in the Mailing Lists section.

Tip #42

Enable threaded view of messages in Vivaldi Mail with a click of a button.

Threaded view of the mailbox is a great way to keep related messages together in a hierarchical order, thus saving you time from needing to look for the other messages in the email conversation or trying to figure out for which message the reply is for.

To enable threaded view:

  1. Open the Mail tab.
  2. In the top right corner, click on Show Message Thread / Hide Message Threads.

Depending on your choice, you’ll see one of the following views.

Unthreaded view

Threaded view

List of messages - threaded

Tip #38

Reorder sections in the Mail Panel to your liking.

The center point of Vivaldi Mail, the Mail Panel displays 8 sections: All messages, Custom folders, Mailing Lists, Filters, Flags, Labels, Feeds, and All Accounts.

If the default order doesn’t suit you, you can reorder the sections. If you know you’ll never use a specific section, you can hide it altogether.

To customize the Mail Panel:

  1. Go to Settings > Mail > Mail Settings > Mail Panel Order and Visibility.
  2. Select the section you want to move.
  3. Click on the arrows at the bottom of the list to move the folder up or down.
    Alternatively, click and drag the section to its new location.

To hide a section untick the box in front of the section name.

Tip #37

Enable Mail, Calendar and Feeds from Settings > General > Productivity Features.

Vivaldi Mail, Calendar and Feeds have shed the Beta tag from their name and are now proudly version 1.0. 🥳

To start using Mail, Calendar and Feeds:

  1. Go to Settings > General > Productivity Features.
  2. Tick the box for Enable Mail, Calendar and Feeds.

If you’ve freshly installed Vivaldi or created a new User Profile, select Fully Loaded in the welcome flow.

Then you can start adding your email accounts to Mail, your calendars and events in Calendar, and keep track of the latest content from your favorite creators with Feeds.

For more info about these features check the following links: