Match Vivaldi’s App Icon with your iPhone’s and iPad’s style.
Vivaldi on iOS offers a selection of App Icons for you to choose from. Your chosen icon will be displayed on the home screen, in the App Library, and elsewhere where Vivaldi is displayed.
Create a schedule to change Themes automatically throughout the day.
Whether just for some variety or to give subtle hints about the time to yourself, you can make your Vivaldi browser on desktop switch the themes automatically according to your set schedule.
Set an Extension as the New Tab Page in your Vivaldi browser.
When you open a new tab in Vivaldi, you have various options for what’s displayed in the new tab before you navigate to a web page. You can choose between the Start Page, Home Page, Blank Page, or a web page of your choice. But there’s one more option – a New Tab Page Extension.
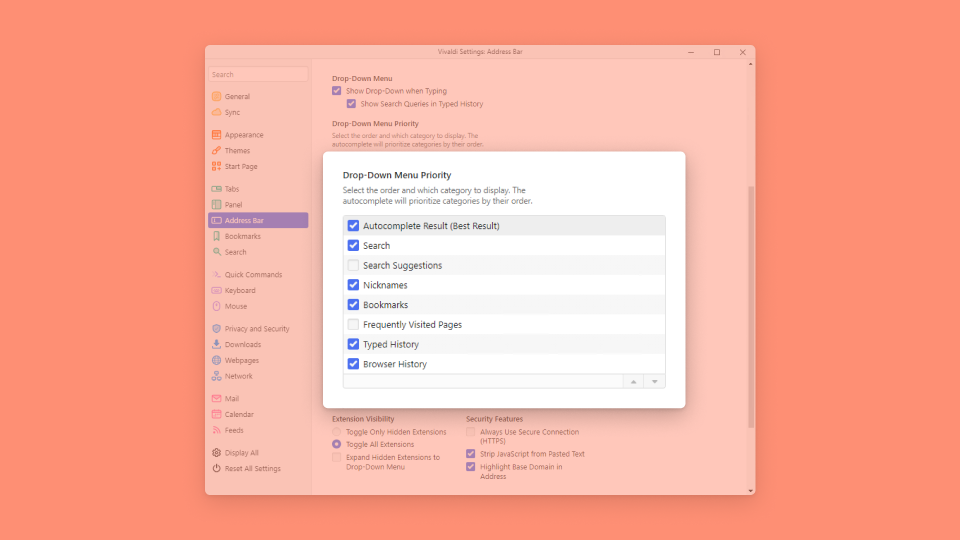
Reorder Address Field drop-down menu’s categories according to your preferences.
Do you use the Address Field search more for finding an entry in your History than for Bookmarks? Or do you want Frequently Visited Pages to be listed before Search Suggestions? In the Vivaldi browser, you can tailor the drop-down menu according to your needs.
Click and drag the edge of the Tab Bar to resize it.
Moving the Tab Bar to the side of the window (see Tip #204 for instructions) is a good way to gain some vertical space for the websites you have open. But your options don’t stop there. On the side of the window, you also have the option to set the width of the Tab Bar.
To resize the Tab Bar:
Hover the mouse cursor over the edge of the Tab Bar.
Click and drag the mouse left or right.
When you’re happy with the size, release the mouse button.
You can make the Tab Bar wider if you wish to read more of the tab titles or make it only wide enough to fit the website’s favicon.
Did you know that in addition to Bookmarks you can add links to sites you visit frequently to the browser’s menus? And we’re not just talking about the main Vivaldi menu here. You can add a link to all (context) menus Vivaldi has. Nice! 😎
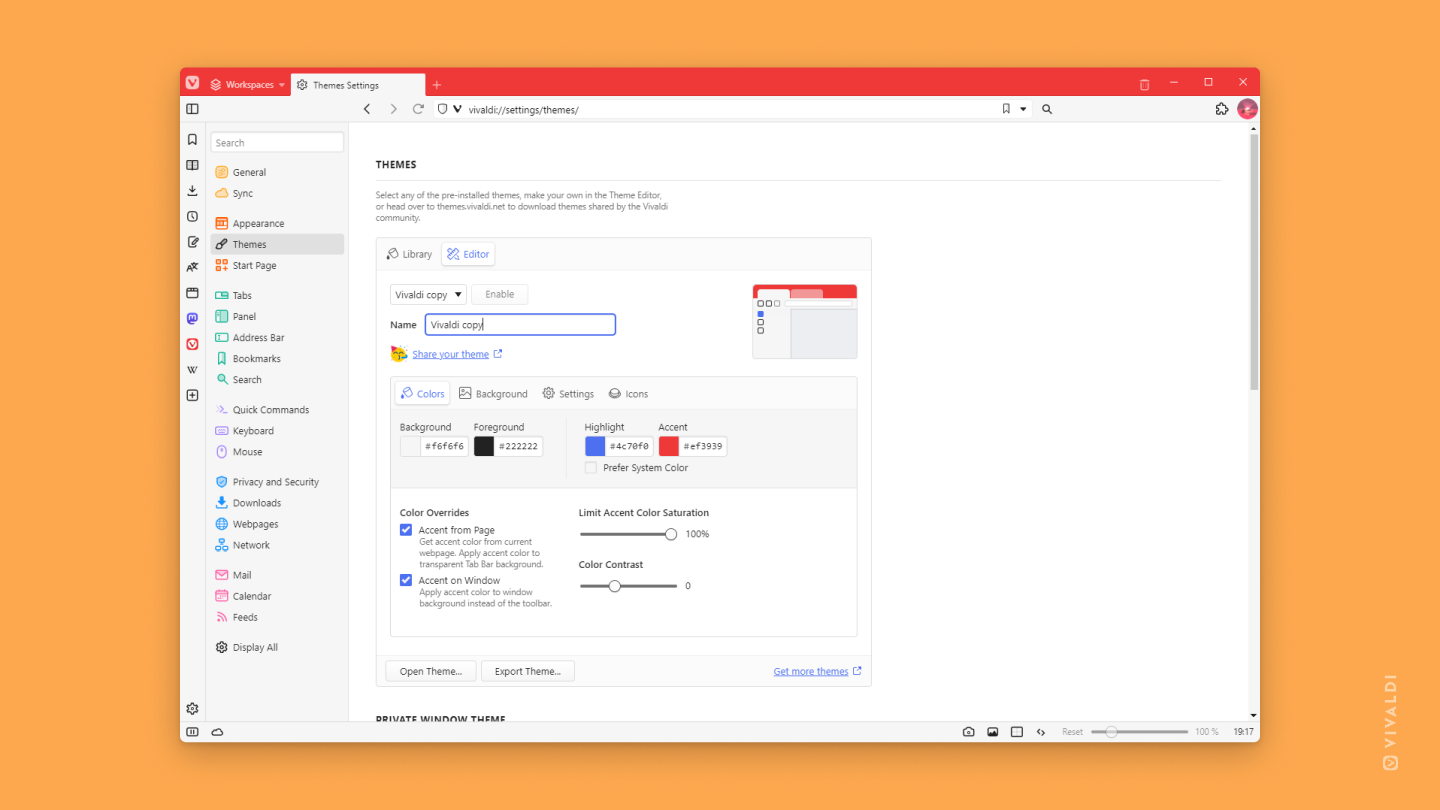
Create a copy of a theme and edit that, instead of changing the original.
Themes in the Vivaldi Browser allow you to make the browser more personal. Though there are many default themes to choose from and a huge selection on themes.vivaldi.net, the one you like might be missing that final touch that makes it perfect for you. But instead of updating the original theme, create a copy of it and update the copy. That way you can go back to the original theme or use it again to create another theme.
Download Custom Icons for your browser from Vivaldi Themes.
Using Custom Icons with your browser theme, allows you to take the uniqueness of your Vivaldi to yet another level. You can create an icon for each toolbar button yourself or you can make use of the numerous Themes with Custom Icons the creative minds of Vivaldi Community members have shared with everyone.
Give the Search Field the space it needs by resizing it.
In addition to deciding what elements are displayed on your Vivaldi Browser’s toolbars, you can also adjust the size of some of them, for example, the Search Field on the Address Bar.
To resize the Search Field:
Hover over the left edge of the Search Field.
Click and drag the mouse left to make it bigger or right to make it smaller.
Switch Workspaces with one click with the aid of Command Chains, Toolbar Editor and Custom Icons.
There are some unique ways you can use different Vivaldi features together to make the browser behave the way you want it. For example, with the help of Command Chains, Toolbar Editor and Custom Icons you can take Workspaces to the next level. Here’s how:
Step 1 – Create Command Chains for switching Workspaces.
Replace the placeholder command with “Switch to Workspace #”. The number corresponds to the order in which you created your Workspaces.
Create a chain for every workspace. In each chain, you can also add other commands that will be executed at the same time. For example, add the command “Switch to theme” to make workspaces visually more different.
Use spaces and separators to create different sections on the toolbars.
Panels and Web Panels on the sidebar, navigation buttons on the Address Bar, tools on the Status Bar – in Vivaldi there are many buttons to click. To organize buttons into groups you can use Space, Flexible Space and Separator elements between them.
To add dividers:
Right-click on a toolbar you want to customize.
Select Edit > Customize Toolbar from the context menu.
Drag a Space, Flexible Space or Separator element from the editor window to the spot on the toolbar where you want to add it.
Click Done.
To remove an element, while the Toolbar Editor is open, drag the element from the toolbar and drop it on the area between toolbars and the editor.
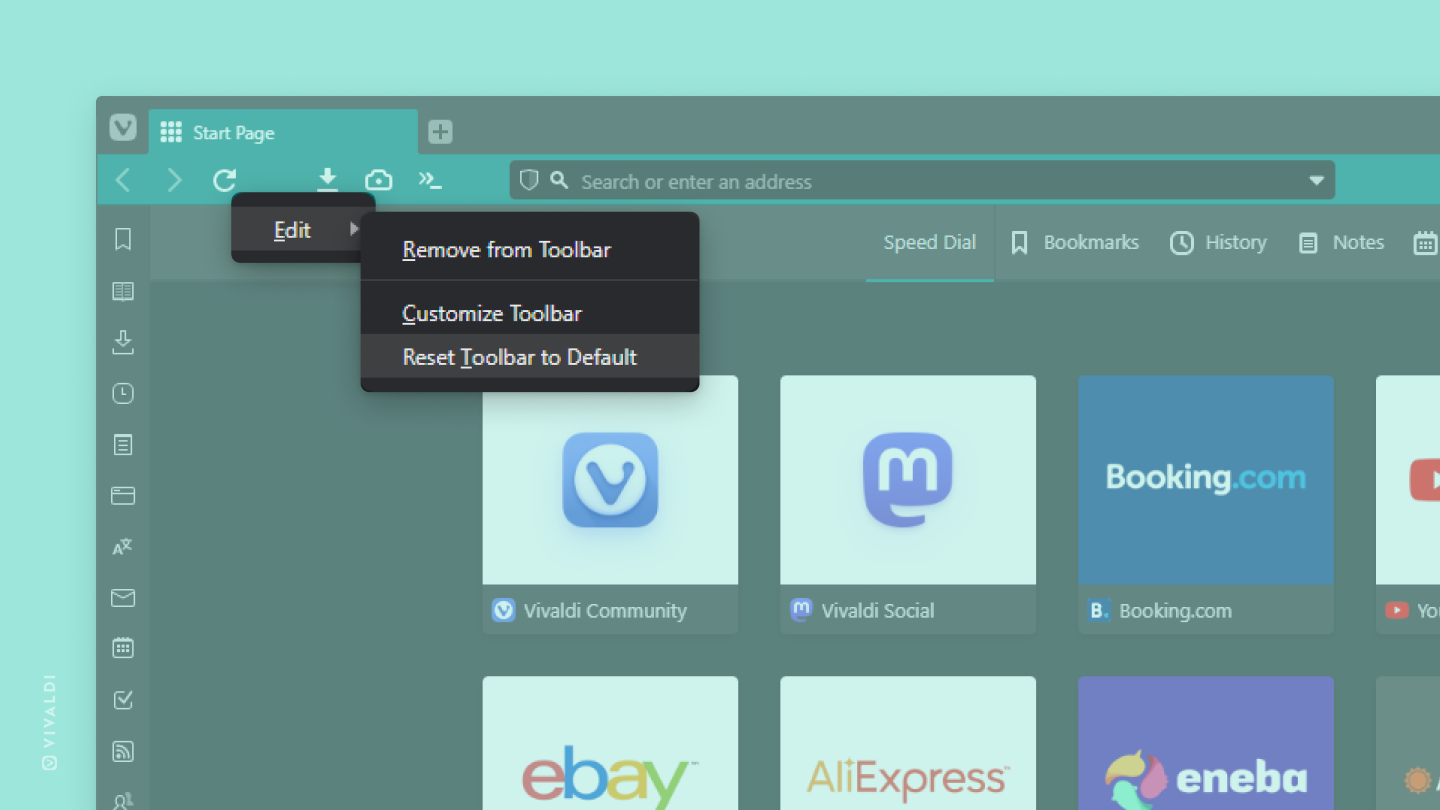
The level to which you can customize the toolbars on Vivaldi’s desktop version is unrivaled. But sometimes we can get carried away with our creativity, so it might help to take a step back and start again with the default configuration.
To reset the toolbars:
Right-click on the toolbar you want to reset.
From the menu, select Edit > Reset Toolbar to Default.
 Vivaldi menu > Settings > App Icon.