Tip #365

Add Custom Search Engines to Vivaldi on desktop manually in the browser’s Settings.

Vivaldi comes with a selection of Search Engines, many of which generate revenue for us, which helps us keep doing what we’re doing. But you can also add your own Search Engines to Vivaldi, such as scientific journal databases, favorite shopping sites, dictionaries, news sites, and almost any other website that has a search field on it.

We shared a quick way of adding new Search Engines in Tip #74. That option doesn’t work on every website, though, so another option is to add one manually.

To add new Search Engines manually:

  1. Do a search on the website you want to add.
  2. In the search results page link, replace the search keyword with %s or %S.
    For example, https://help.vivaldi.com/?s=workspaces >>> https://help.vivaldi.com/?s=%s.
  3. Copy the link.
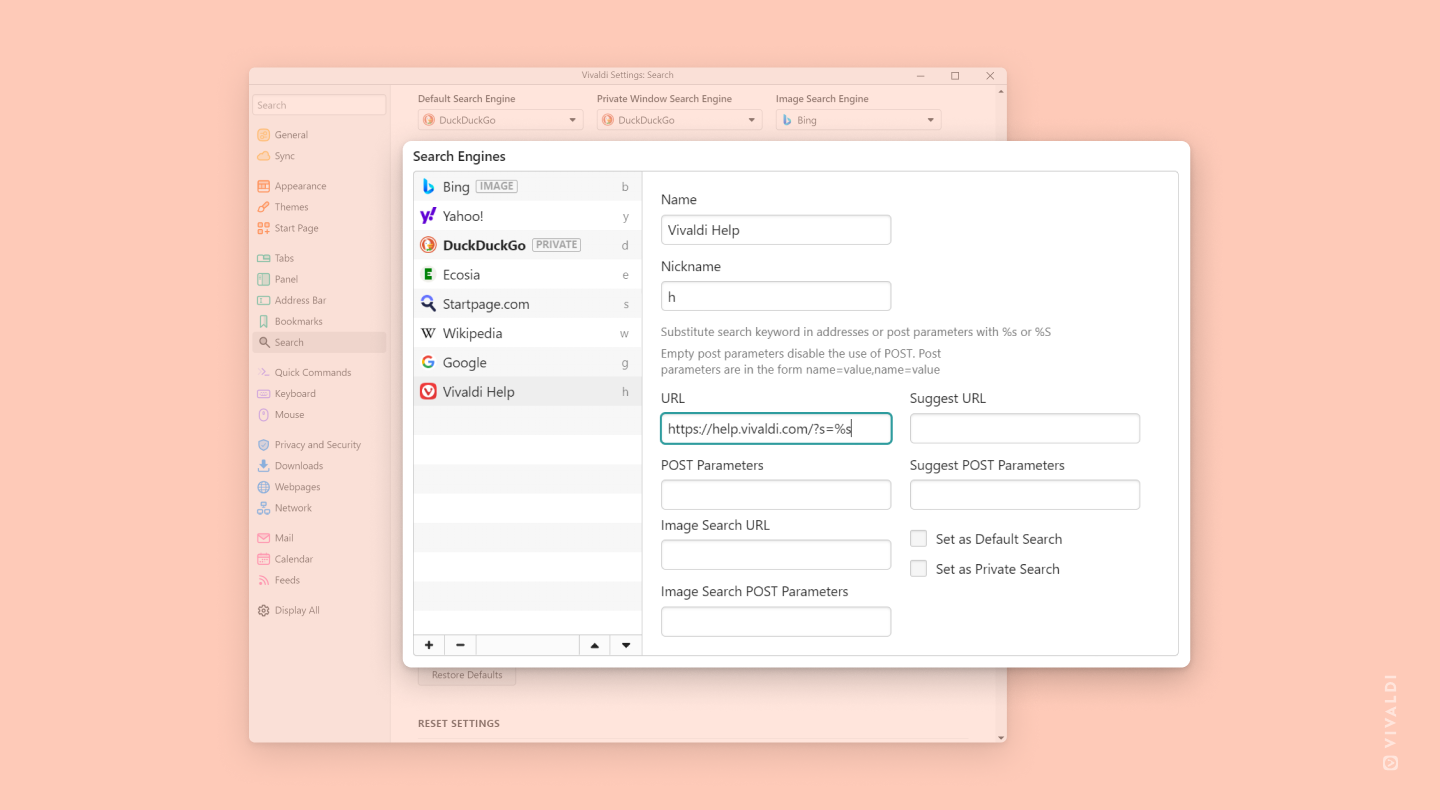
  4. Go to Settings > Search > Search Engines.
  5. Click on ➕ Add Search Engine below the list of existing Search Engines.
  6. Give the new Search Engine a name and a short nickname.
  7. Paste the link in the URL field.

Now you can type the Search Engine Nickname followed by your search keyword(s) in the Address Field and get to results much faster.

Search Engine settings in Vivaldi on desktop.

Tip #364

Create a schedule to change Themes automatically throughout the day.

Whether just for some variety or to give subtle hints about the time to yourself, you can make your Vivaldi browser on desktop switch the themes automatically according to your set schedule.

To schedule Themes:

  1. Go to Settings > Themes > Theme Schedule.
  2. Enable “Manual Schedule”.
  3. Adjust the timeslot lengths by using the sliders between them.
  4. Click on “Add” to create additional timeslots.
  5. Select a theme for each.
Theme Scheduling settings in Vivaldi browser.

Tip #363

View 2 websites side by side in Vivaldi on Android.

Tiling tabs is very popular on the desktop version of Vivaldi, but did you know you can tile 2 web pages on Vivaldi on Android as well?

To view 2 sites side by side:

  1. Open a new Vivaldi window following the instructions in Tip #180.
  2. Open your Android device’s app switcher.
  3. Long press on the logo of one of the Vivaldi windows.
  4. Select “Open in split screen view” from the menu that opens.
  5. Select the other Vivaldi window to display it on the other half of the screen.

You can even resize the tiles by moving the line dividing the two windows.

Vivaldi on Android with 2 Vivaldi windows tiled.

Tip #362

Edit a new bookmark in the bookmark dialog right after adding it.

There are over 10 different ways you can add new Bookmarks in Vivaldi (see them all in Tip #137). If you’re in the habit of editing bookmarks’ titles, descriptions, nicknames, and/or folders they’re in, you can open the bookmark dialog to do so. For example, if you added a bookmark from the button on the Address Bar, click it again to open the dialog, or use the bookmarking Keyboard Shortcut a second time.

In case you edit the bookmark right after adding it more often than not, you can make Vivaldi open the dialog as you’re adding the new bookmark. To do that:

  1. Go to Settings > Bookmarks.
  2. Enable “Always Open Bookmark Dialog”.
Vivaldi browser with a bookmark dialog open and highlighted.

Tip #361

Set Vivaldi as the default browser on iOS.

You might not be ready to commit to making Vivaldi the default browser right after installation, but after using the app for a bit, you’ll likely want to use Vivaldi as your main browser.

To make Vivaldi your default browser on iOS:

  1. Go to  Vivaldi menu > Settings > Default browser.
  2. Tap on Open Vivaldi Settings.
  3. Tap on Default Browser App.
  4. Select Vivaldi.
Default browser settings in Vivaldi on iOS.

Tip #360

Exclude accounts you’ve added to Lists from your Vivaldi Social Home feed.

Lists are a great way to group similar accounts and view them together. By default, posts from all accounts you follow will show up in the Home feed, but there is an option to exclude accounts you’ve added to Lists.

To hide Lists’ posts from Home:

  1. Go to a list’s page.
  2. Click on “Show Settings”,
  3. Toggle on “Hide these posts from home”.
Lists page with settings open and "Hide these posts from home" highlighted.

Tip #359

Press Ctrl + Enter to send a message in Vivaldi Mail.

When you already have your fingers on the keyboard when typing a message in Vivaldi Mail, it’s easier to use a Keyboard Shortcut to send the email than to look for the “Send” button on a toolbar.

When you’re ready to send the email, just press Ctrl + Enter (Cmd + Enter on macOS). It’ll also close the composer, allowing you to move on to the next message or continue browsing.

Discover more Mail shortcuts in Settings > Keyboard > Mail or on Vivaldi Help.

Tip #358

Make use of the blogging platform’s Spotlight mode to focus on the block you’re working on.

Do you sometimes find it hard to write a post on your Vivaldi blog? Look into Spotlight mode. It dims out all other blocks in the post/page editor, helping you keep your attention on the block you’re currently working on.

To enable Spotlight mode:

  1. In the top right corner of the editor, click on Options.
  2. Enable Spotlight mode.
Vivaldi blog editor with Spotlight mode enabled. Options menu is open on the side.

Tip #357

Install Vivaldi on your iPhone and iPad!

The day has arrived when you no longer need to wait for an invitation to get your hands on a preview of Vivaldi on iOS. Now you can go to the App Store and install the official first version of Vivaldi on iOS on all your Apple devices.

Once you’ve done this, tell your family and friends to install Vivaldi on their phones and tablets as well.

Tip #356

Choose your preferred languages for websites in Vivaldi on Android.

Some websites have content in multiple languages and check your browser/OS setting to decide which language to display it in. In Vivaldi on Android, you can choose the languages you’d like to see websites in.

To review and add preferred languages:

  1. Go to the Vivaldi menu > Settings > Language settings > Preferred languages.
  2. Tap on Add language.
  3. Select your language from the list.

You can change the order of priority by tapping on the  symbol in front of the language name and dragging it up or down in the list.

Preferred languages settings in Vivaldi on Android.

Tip #355

Opt into including your public posts in search results on Vivaldi Social.

If you’d like your posts on our Mastodon instance, Vivaldi Social, to reach every corner of the Fediverse, you can allow your public posts to be included in search results.

To opt in:

  1. Go to Preferences > Privacy and reach > Search.
  2. Enable “Include public posts in search results”.

If you want to exclude a specific post from search, set the post’s privacy to “Unlisted”, “Followers Only” or “Mentioned people only”.

Vivaldi Social's privacy and reach settings. "Include public posts in search results" option is highlighted.

Tip #354

Get your Extensions in order with drag and drop.

Extensions on your browser toolbar appear in the order you add them, but you can rearrange them easily.

To reorder Extensions:

  1. Hold down the Ctrl / * key on your keyboard.
  2. Drag an extension’s toolbar button to change its location among your Extensions.

On macOS, release the  key before you release the mouse button.

Tip #353

Save everything in one place and skip the Downloads dialog.

Some have set up a meticulous folder system for all their files, others save everything in one place and maybe sort things out later. If you’re in the latter camp, you can enable a setting in Vivaldi that lets you skip the Downloads dialog that asks you where you want to save each file.

To skip the Downloads dialog:

  1. Go to Settings > Downloads.
  2. Enable “Save Files to Default Location Without Asking”.
Downloads settings in Vivaldi browser.

Tip #352

Take the odd one out by removing a single tab from a Tab Stack.

Grouping tabs into Tab Stacks is a great way to keep your tabs neat and organized. But what to do with a tab that has ended up in the wrong stack? Use one of the following ways to remove a single tab from a Tab Stack:

  • Right-click on the tab and select “Remove from Tab Stack” from the context menu.
  • Drag the tab off the Tab Bar and move it back as a top-level tab.
  • Drag the tab out of the stack in the Windows Panel.
  • While you have the tab open, open Quick Commands and type in “Remove from Tab Stack”.
  • If it’s a frequent occurrence, create a Keyboard Shortcut or a Mouse Gesture for the action.
Stacked tab's context menu open with the remove option highlighted.