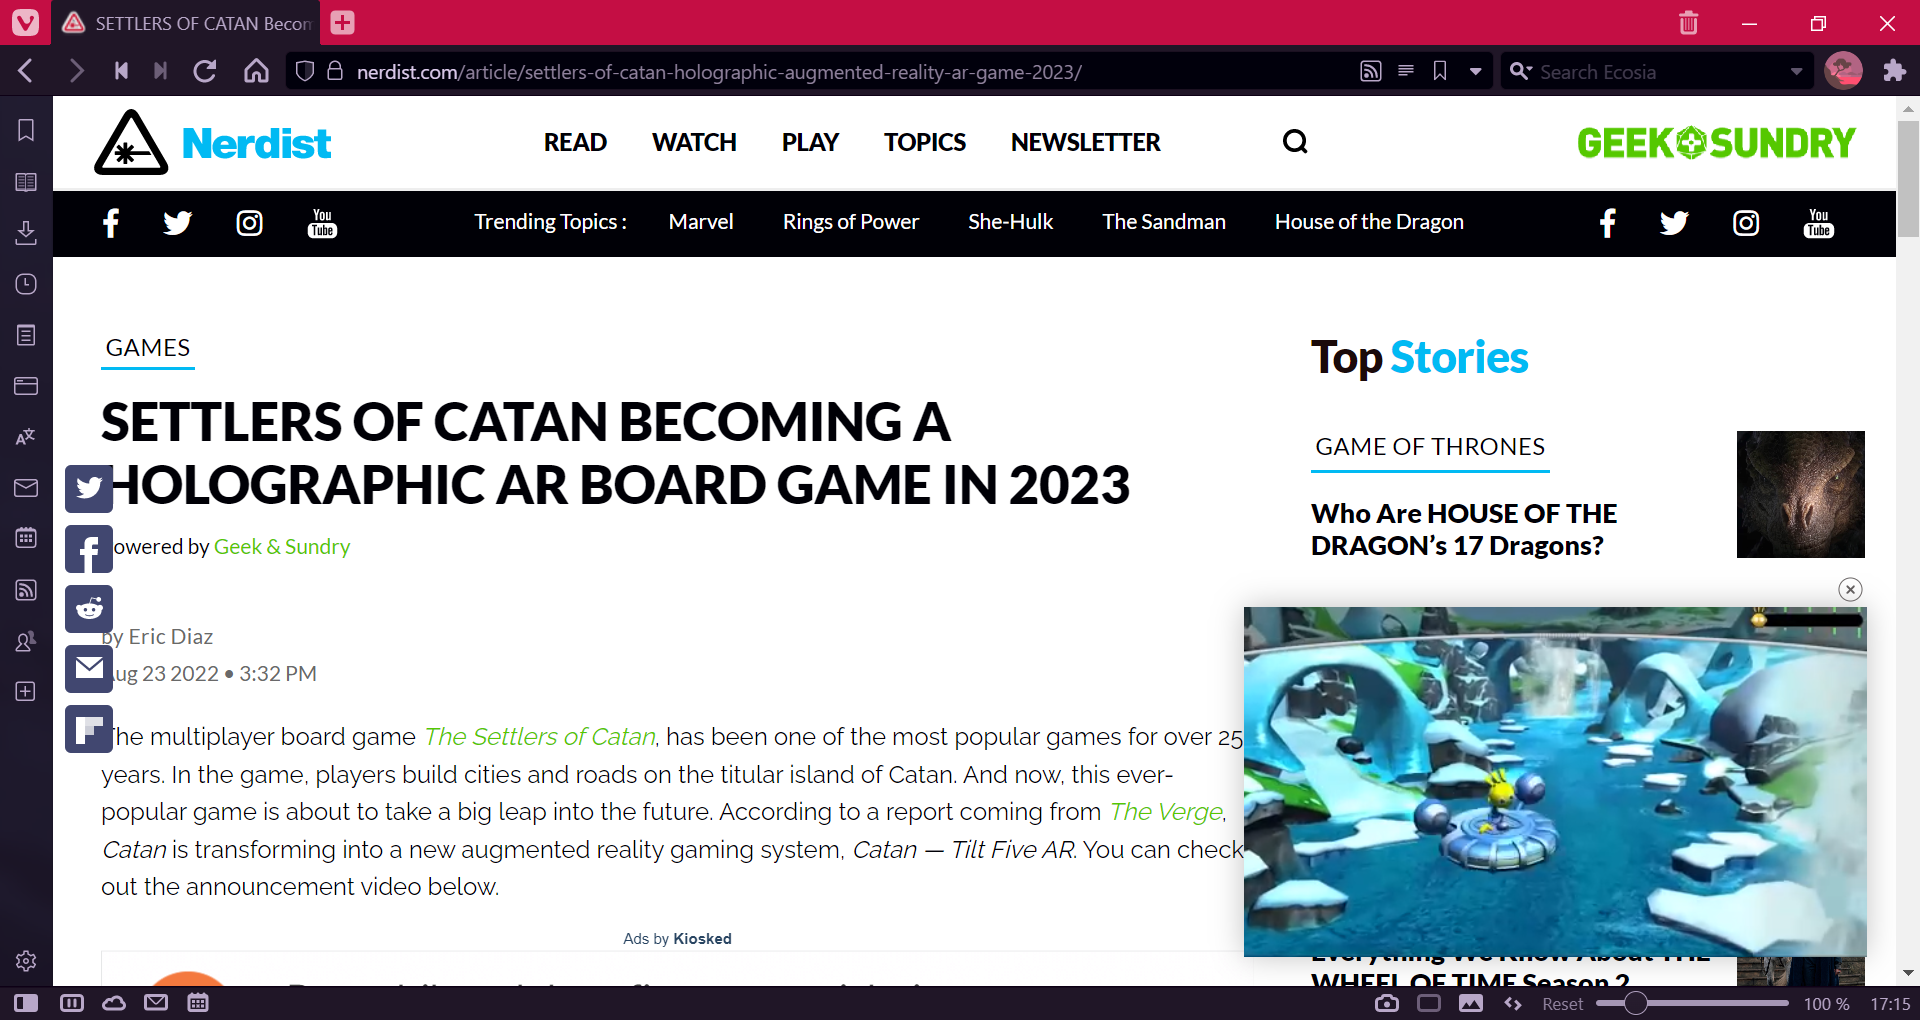
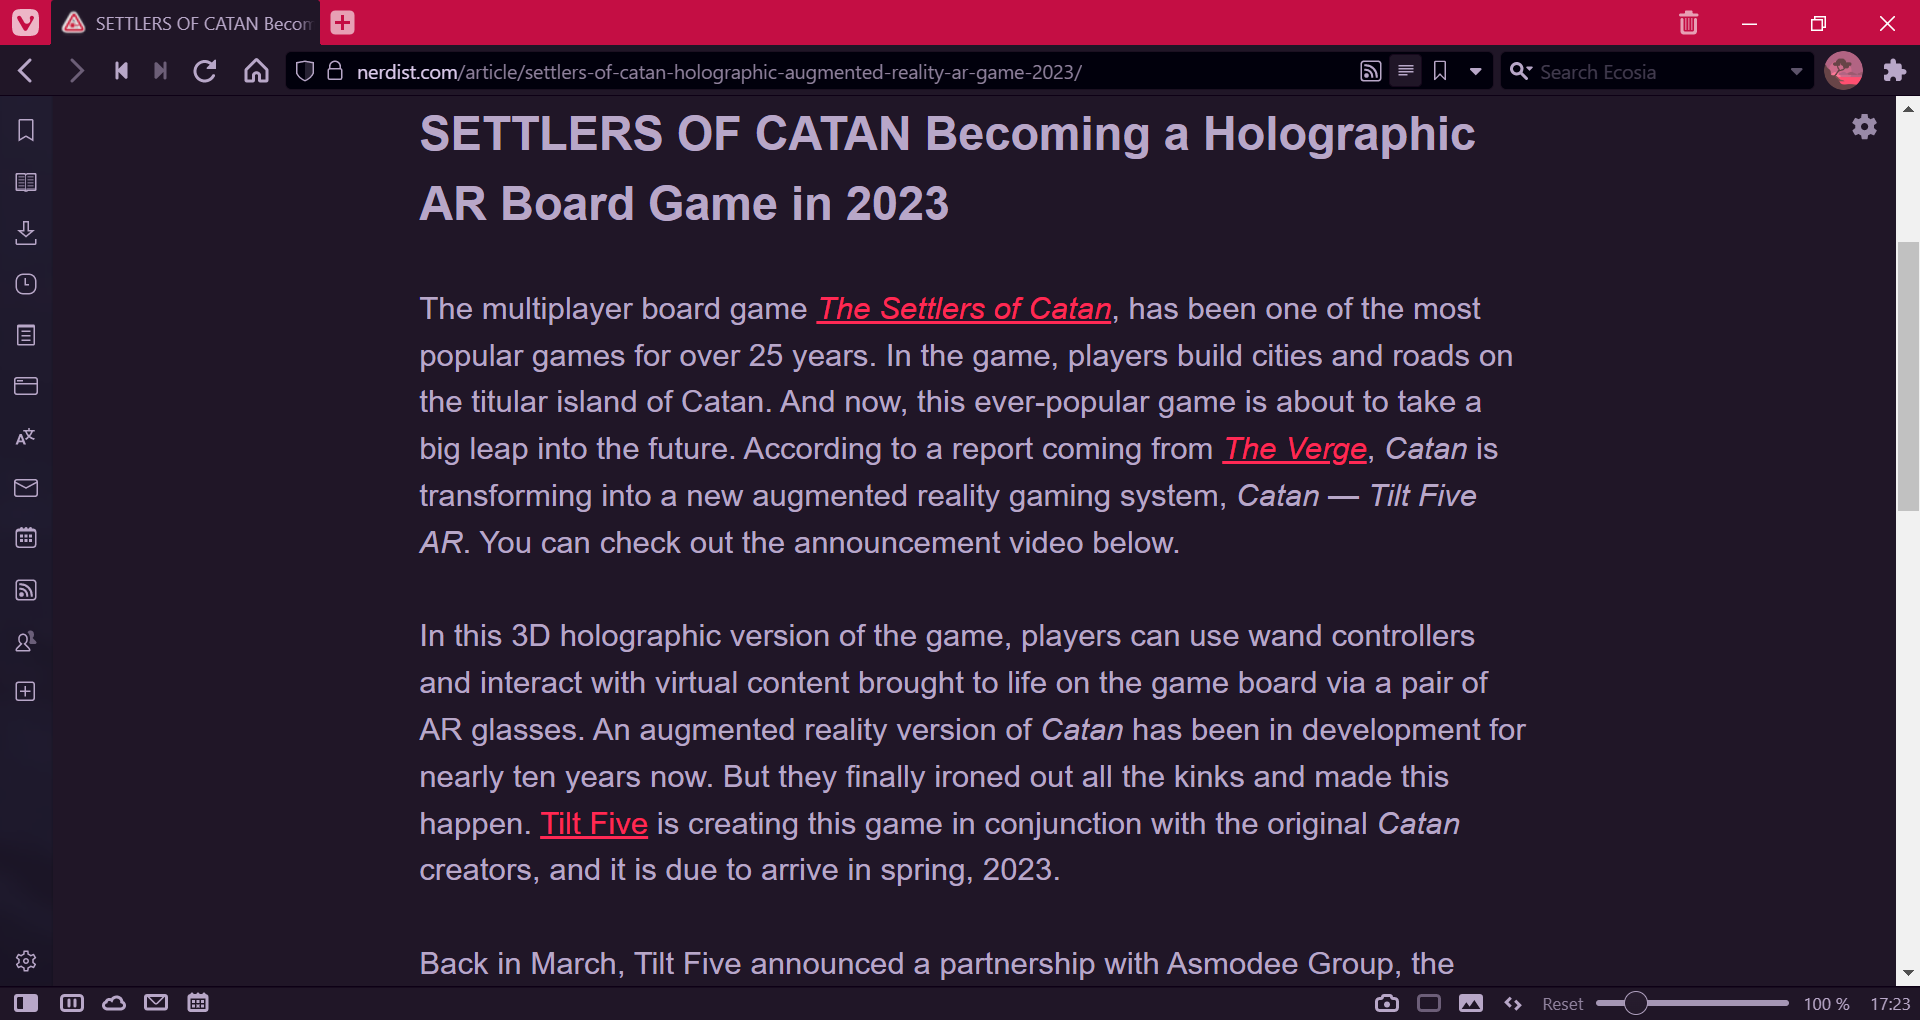
Tip #26

Enable “Clear session browsing data on exit” in Vivaldi on Android to close all tabs and delete history, cookies and cache after use.

To enable the settings:

  1. Go to the Vivaldi menu > Settings > Privacy and security > Clear browsing data on exit.
  2. Toggle on the setting.
  3. Choose which data types you want to delete:
    • Browsing history.
    • Cookies and site data.
    • Cached images and files.
    • Close open tabs.

It’s not enough to minimize the app or remove it from the app switcher menu to exit the browser. To exit Vivaldi:

  1. Go to the Vivaldi menu.
  2. Scroll to the bottom of the menu.
  3. Select Exit.

Tip #25

Create a page capture title template that works for you.

When you take a screenshot of a web page using Vivaldi’s Capture tool and save it as a file on your computer, a title will be generated automatically. You can decide what information the title includes. To change the template:

  1. Go to Settings > Webpages > Image Capture.
  2. Add the information you want in the title using drag and drop and delete the bits that you don’t need. You can even type something in the template field yourself. 😊
Animation showing the changing of capture name template

Tip #24

Long click on History Back and Forward buttons to view and open recently visited pages.

Instead of clicking the Back/Forward button multiple times to return to a recently visited page, you can open a list of visited pages and open the one you need directly.

Here’s how:

  1. Long click or right-click on the Back/Forward button on the Address Bar.
  2. In the list of entries, click on the page you want to return to.
Vivaldi with History list open.

It also works on Android! 🥳 Just tap and hold your finger on the Back/Forward button until a list with your recently visited pages opens.

Bonus tip!

On desktop, when you right-click on the list entry or hold down the Ctrl/⌘ key while clicking, the page will open in a new tab.

Tip #23

Use Sync to access tabs that are open in Vivaldi on your other devices.

With the Sync feature you can synchronize your browser data across Vivaldi on multiple devices (computers, phones, tablets and even with some cars). In addition to Bookmarks, Notes and other data, you can also sync your open Tabs.

To sync Tabs:

  1. Log in to your Vivaldi account in Settings > Sync on all devices you want to keep in sync.
  2. Enable either syncing of all data or at the very least syncing of History (typed URLs and open tabs).
  3. When you want to view the tab you have open on another device, click on the Synced tabs button on the far side of the Tab Bar, select the synced device and click on the web page you want to open.
    On Android, open the Tab Switcher and navigate to Synced tabs from the menu at the bottom of the window. Then, tap on the web page you want to open.
Synced tabs menu open on desktop version of Vivaldi.

Tip #21

Watch videos in a floating window using the Pop Out Video feature.

The Pop Out Video feature, aka Picture-in-Picture, allows you to display HTML5 videos in a floating window so that you can continue watching the video while scrolling down a page or changing tabs.

To pop a video out from a web page:

  1. Hover the mouse cursor over the video.
  2. Click on the pop out video button that appears at the top edge of the video.

If you don’t see the button, check that Picture-in-Picture Button on Videos is enabled in Settings > Webpages.

Learn more about the feature on our Help page about Pop Out Video.

Pop out Video (picture in picture) window in Vivaldi browser

Tip #20

Add Extensions to Vivaldi from Chrome Web Store.

Vivaldi comes with a lot of built-in functionality, but you can do some additional fine tuning by adding Extensions. Since Vivaldi is built on Chromium, most Extensions available on Chrome Web Store also work in Vivaldi.

To add Extensions:

  1. In Vivaldi, go to Chrome Web Store.
  2. Search for the extension you want to add to Vivaldi.
  3. On the extension’s profile, click Add to Chrome.
  4. In the dialog, click Add extension.

To learn more, go to our Help page about Extensions.

Tip #19

Enable “Remove cookie warnings” in Tracker and Ad Blocker settings to hide websites’ cookie dialogs.

Since Europe’s GDPR and a few other user privacy laws don’t allow placing Cookies in your browser without consent, on your first visit, most websites ask for your permission as soon as the page has loaded. Accepting all cookies will allow the website and third parties to collect information on you and use the data in an attempt to influence your decisions later on. Until there’s better legislation, we recommend rejecting these cookies. But, depending on the website, rejecting all cookies can take minutes, slowing down your browsing significantly.

That’s why we’ve added a way to remove these cookie dialogs in the browser. To enable it:

  1. Go to Settings > Privacy > Tracker and Ad Blocking > Blocking Level.
  2. Enable Block Trackers and Ads.
  3. Then, click Manage Sources.
  4. In the list of Ad Blocking sources, look for “Remove cookie warnings (EasyList Cookie List)” and “Remove cookie warnings (I don’t care about cookies)” and enable them.

Enabling these lists will simply block the service that asks for consent, or hide the consent dialog, in the same way as it might remove a tracker or an ad. Without consent cookies cannot be placed in the browser.


We at Vivaldi believe that spying on users on the Internet using cookies and other tracking methods should be banned. To join our fight, check out https://banspying.org and share it with your friends.

Tip #18

Switch Themes with a keyboard shortcut.

Not in the mood for the current theme, but don’t feel like opening Themes Settings either to pick a different one? No problem. In Vivaldi, you can switch to the next theme in your Theme Library with a Keyboard Shortcut.

Since the command doesn’t come with a default shortcut, you first need to assign one to it.

  1. Go to Settings > Keyboard > View.
  2. Find the command ‘Next Theme’ on the list.
  3. Assign a shortcut to it.

Now, whenever you feel like changing the theme, just use the shortcut. Use it multiple times in a row to shuffle through all themes in your Theme Library.

By the way, you can also type “Next Theme” in Quick Commands or use a Mouse Gesture.

Tip #17

Organise your Tab Stacks by renaming them.

When you group tabs into a stack, the icon and title of the most recent active tab in the stack will be shown on the Tab Bar. With many tabs and stacks, locating the tab you need can still take time. Tab Stack renaming to the rescue!!! By giving the stack a title, you can spot the right stack on the Tab Bar in no time. 💪

There are a couple of ways to rename a Tab Stack.

Option 1

  1. Right-click on the Tab Stack.
  2. Select Rename Tab Stack from the context menu.
  3. Give the Tab Stack a name.
  4. Press Enter or focus elsewhere in the browser to save the new name.

Option 2

  1. Double-click on the Tab Stack.
  2. Give the Tab Stack a name.
  3. Press Enter or focus elsewhere in the browser to save the new name.

In case you have enabled minimizing tabs or closing tabs on double-click, it’s not possible to start renaming a Tab Stack with double-click.

Option 3

  1. In the Window Panel, right-click on the Tab Stack.
  2. Select Rename from the context menu.
  3. Give the Tab Stack a name.
  4. Press Enter or focus elsewhere in the browser to save the new name.
Vivaldi Tab Bar with 3 Tab Stacks.
1st and 2nd Tab Stack have been renamed. 3rd Tab Stack has the title from the web page.

Tip #16

Subscribe to Forum Digest to get a selection of the latest discussions and notifications in your mailbox.

  1. Log in to your Vivaldi account.
  2. Go to https://forum.vivaldi.net/me/settings.
  3. Scroll down to the Email section.
  4. Choose how often you want to receive the Digest email. Choices are:
    • Daily,
    • Weekly,
    • Bi-weekly,
    • Monthly, and
    • Off i.e. disabled.
  5. Click Save Changes.

The emails will be sent at the chosen interval to your account’s recovery email address.

Tip #15

Right-click on a Panel and select Separate Width to resize only the selected Panel.

Not all Panels are equal. Give each Panel the width it needs to display the content in the best possible way.

To resize a Panel:

  1. Right-click on a Panel you want to resize.
  2. Select Separate Width from the context menu.
  3. Place the mouse cursor over the outer edge of the Panel and drag to resize.

Tip #14

When sharing the URL itself is not convenient or possible, share links using QR codes generated in Vivaldi

There are multiple ways to generate a QR code on the desktop version of Vivaldi.

Option 1

  1. Make sure you’ve enabled the QR Code Generator in Settings > Address Bar > Address Field Options.
  2. Open the web page you want to generate the QR code for.
  3. Click on the QR code button on the right side of the Address Field.
Vivaldi window with QR code generation dialog open.
You can even use QR codes to Rickroll a friend. 😄

Option 2

  1. Open the web page you want to generate the QR code for.
  2. Open Quick Commands.
  3. Type “Create QR Code for Active Page”.
  4. Press Enter to execute the command.

Option 3

  1. Create a Keyboard Shortcut or a Mouse Gesture for creating QR codes in Settings.
  2. Open the web page you want to generate the QR code for.
  3. Use the shortcut whenever you want to create a new QR code.

When the code has been created, you can download the QR code as an image, copy the QR code image or show your device’s screen to someone, who can scan the QR code with their device.

Generate QR codes on Android

To create a QR code on your Android device:

  1. Open the web page you want to generate the QR code for.
  2. Go to the Vivaldi menu > Share.
  3. From the bottom row of options (screenshot, copy link, etc.) swipe left and select QR Code.

When the code has been created, you can either download the QR code as an image or show your device’s screen to someone, who can scan the QR code with their device.

Tip #13

Type “Show Webpage Access Key Shortcuts” in Quick Commands to see which shortcuts you can use on the open web page.

Access Keys are a way to use a website’s key functionalities through keyboard shortcuts. Each website defines these shortcuts themselves.

To view the available shortcuts, either:

To use the shortcut, hold down Shift+Alt (Ctrl ⌥ on maOS) and the listed key to run the shortcut on the open web page.

Wikipedia.org, with the website's access keys listed in a pop up window.