Tip #456

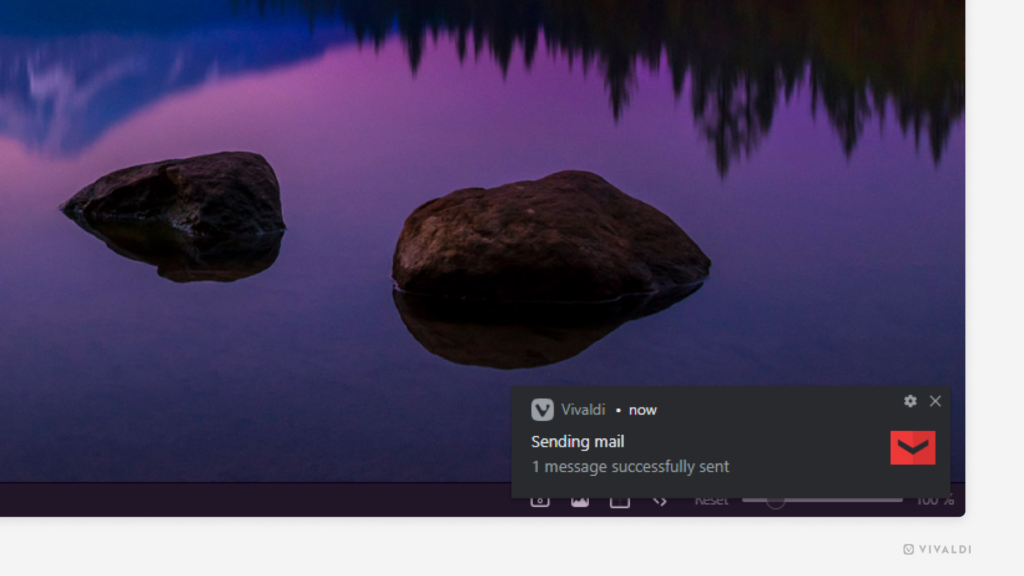
Get confirmations for successfully sent messages in Vivaldi Mail.

Whether you’re on an unreliable network or just want to confirm that your message was sent, seeing a notification at the corner of the screen will put your mind at ease.

To enable sent mail notifications:

  1. Go to Settings > Mail > Mail Settings > Mail Notifications.
  2. Enable “Notify on Successfully Sent”

Tip #454

Give Saved Sessions unique and easily recognizable names.

Saving tabs as a Session is a great way to save a selection of tabs for easy access at a later date. While you don’t need them, you can close the tabs to declutter your browser and free up some resources.

To rename a Session:

  1. Open the Sessions Panel.
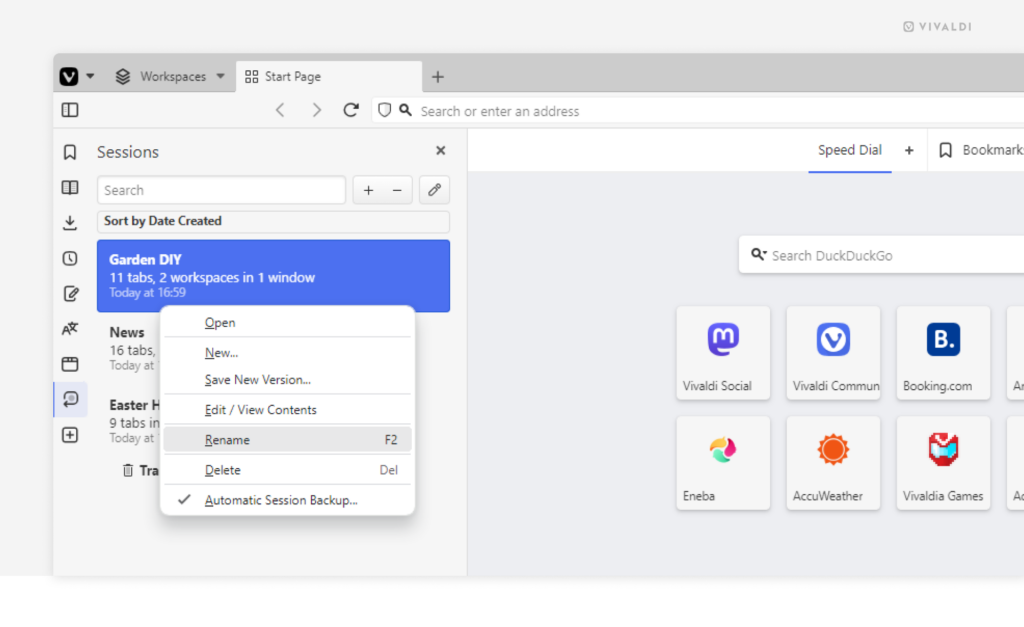
  2. Right-click on the session you want to rename and select “Rename” from the context menu.
  3. Type in the new name and press Enter.
Sessions Panel in Vivaldi browser. Context menu with the Rename option open.

Tip #452

Display Vivaldi browser’s user interface in your preferred language.

Prefer to have apps in your mother tongue or want to learn new vocabulary in a different language? Then it’s time to explore the language settings in Vivaldi.

To change the user interface language:

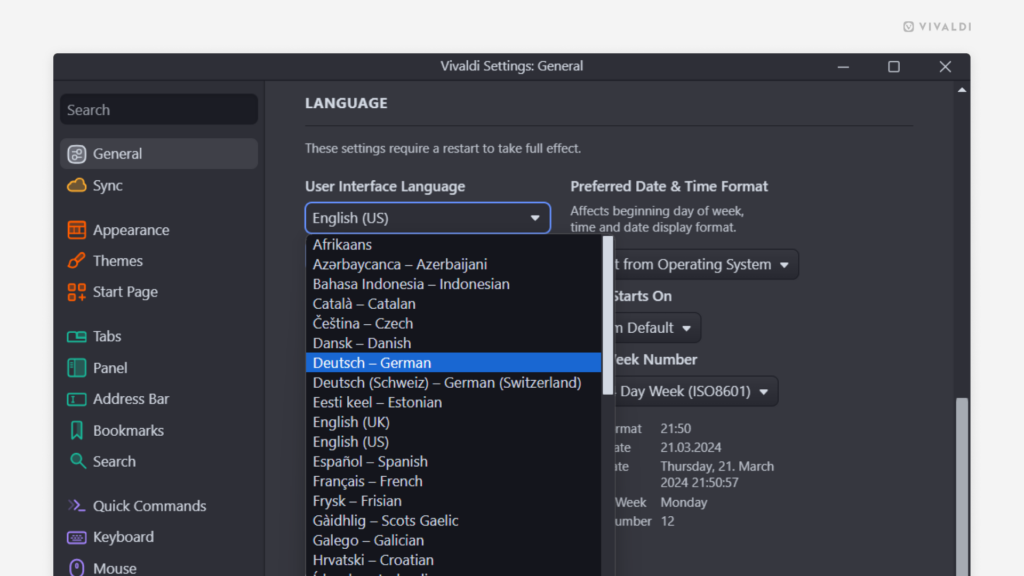
  1. Go to Settings > General > Language > User Interface Language.
  2. Select your preferred language from the drop-down menu.
  3. Click “Save Language” and confirm the decision.
  4. Restart the browser.

If you don’t see the language of your choice as an option, but you’re well-versed in both English and that language, reach out to us and help us translate the browser.

Vivaldi browser's Settings window with User Interface Language dropdown showing available languages.

Tip #450

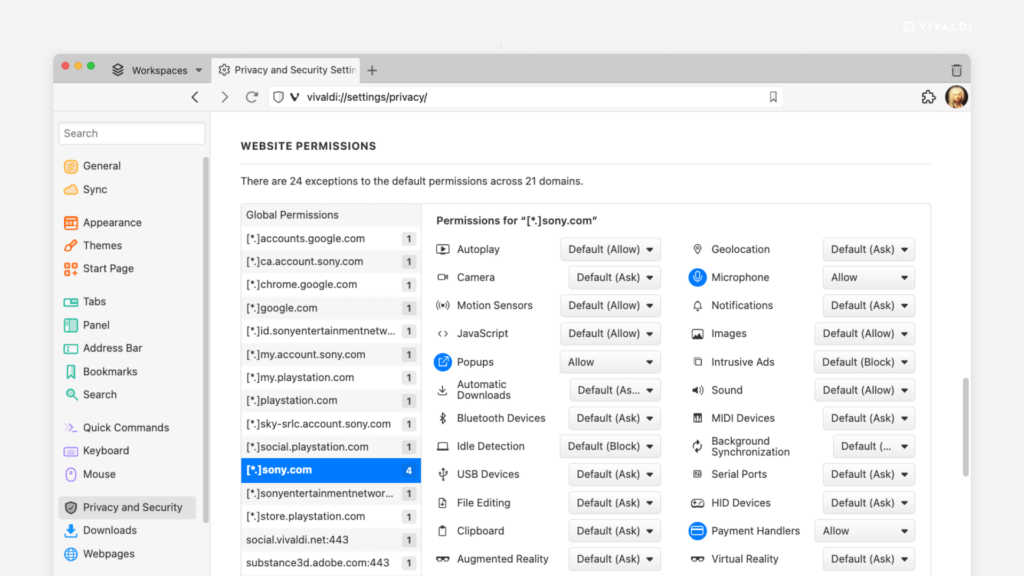
Review and update global and per-site Website Permissions in Privacy and Security Settings.

One website wants access to your location, another wants to send you notifications, a third wants access to your camera and microphone, and so on. It’s not easy to remember to which websites you’ve given which permissions. Luckily, you’ll find all websites and their permissions listed neatly in Vivaldi’s Settings.

To review and update Website Permissions:

  1. Go to Settings > Privacy and Security > Website Permissions.
  2. Select either Global Permissions to review the defaults or a specific website on the list.
  3. Use the drop-down menu next to each permission type to update it.
Vivaldi browser window with Website Permission settings open.

Tip #449

Set Vivaldi’s internal pages as the Homepage or New Tab Page.

Start Page with your Speed Dials isn’t the only option for your Homepage and New Tab Page. You can also set pages of your choice to open when you go to your homepage or open a new tab. It’s common to set a website as one of these pages, but you could also open Bookmarks, Notes, Calendar, and more.

To set an internal page as the Homepage/New Tab Page:

  1. Go to Settings > General > Homepage or Settings > Tabs > New Tab Page.
  2. Select “Specific Page”.
  3. Enter the internal page’s link. For example vivaldi://bookmarks, vivaldi://notes, vivaldi://calendar.

Tip #445

Click on the link icon on the Calendar event to open the web page.

When you have enabled Event Property Icons in Settings > Calendar > Calendar Display, you’ll see little icons next to the event title showing what kind of information the event includes.

If you’ve added a web link to the event, you can just click the icon to open it, instead of opening the event to view and open the URL. That’s especially useful when you’ve chosen the Minimal View in Vivaldi Calendar, where only the time and event title are displayed.

Vivaldi Calendar with the link property icon highlighted.

Tip #444

Remove individual History entries from the Address Field.

When you type a link or a search term in the Address Field, you’ll see suggestions from Bookmarks, (Typed) History, Synced Tabs, and more in the Address Field drop-down menu and as the auto-completed suggestion. If some (Typed) History suggestions are no longer relevant, you can remove them.

To delete suggestions from History:

  1. Type something that would bring up the (Typed) History suggestion you want to remove.
  2. Find the entry in the Address Field drop-down menu.
  3. Click on the X that appears on the right side when you hover over the suggestion.
Vivaldi Browser with the Address Field drop-down menu open and an entry selected for removal.

Tip #442

Enable automatic updates to always use the latest version of Vivaldi.

To make use of brand new and improved features, fixed bugs, and important security updates, make sure to keep your Vivaldi up to date. The easiest way to achieve this is by enabling automatic downloading and installing of updates. That way, the update is downloaded in the background and all you need to do is restart the browser when it’s most convenient for you for the update to be applied.

To enable automatic updates:

  1. Go to Settings > General > Updates.
  2. Click on “Show Update Settings”.
  3. Enable “Automatically Download and Install Updates”.
Vivaldi Settings with automatic update setting highlighted.

Tip #441

Back up your Reading List locally by exporting it to a file.

You can export your Reading List as a CSV file from Vivaldi to back up, transfer, or share the articles and pages you’ve saved. The file includes the page link, title, read status, and last interaction time of each saved page.

To export your Reading List:

  1. Go to the Vivaldi menu > File > Export > Export Reading List.
  2. Choose the destination folder.
  3. Click “Save”.
Menu path for exporting the Reading list from the Vivaldi Browser.

Tip #437

Force dark mode on websites that don’t provide a dark theme themselves.

Dark themes have been in for a while, but websites are still catching up with the trend. If you don’t want to wait, you can use Vivaldi’s settings to display even those sites in darker colors.

To enable dark mode:

  1. Go to Settings > Appearance > Website Appearance.
  2. Select “Dark”.
  3. Tick the box for “Force dark theme on all websites”.

Tip #436

Let your theme’s background image shine through the Tab Bar and Panels.

You’ll mainly see the background image on your Start Page, but by tweaking some settings you can make it visible on the Tab Bar and behind Panels as well.

To adjust your theme’s transparency settings:

  1. Go to Settings > Themes > Editor.
  2. Select the them you want to edit.
  3. Go to the Settings section.
  4. Adjust the Panel transparency level, and toggle on Tab Bar and background tab transparency as you wish.
    In addition, you can apply a blur effect to the background image.

Tip #435

Click and hold on a button on the Vivaldi user interface to open its context menu.

Right-clicking on elements on the browser user interface and web pages is a common way to open the context menu with numerous options. On Vivaldi’s Address Bar, the Panels sidebar, and the Mail toolbar, you can open the menus in another way as well. With the left mouse button, just click on a button and hold the mouse button down until the menu opens. Easy-peasy!

Tip #433

Identify Web Pages that are malicious or legitimate by checking the base domain in the Address Field.

Fraudsters are an unfortunate part of the internet, constantly coming up with more and more ways to scam people. To help you spot malicious actors and prevent scams and phishing attacks, Vivaldi highlights the core part of the URL while the rest of the URL will be visible and lowlighted.

For example, if someone is trying to make you think that you’re on Google’s web page, they may use a link similar to this – www.google.fakesite.com. With base domain highlighting in addresses, the real domain will be highlighted and displayed as www.google.fakesite.com. This way you can recognize which company controls the domain and not fall for the scam.

You do have the option to disable base domain highlighting in Settings > Address Bar > Security Features, but we strongly advise you against doing so.

Vivaldi browser window with Address Field highlighted.

Tip #432

Use the Keyboard Shortcut Shift + K to mark messages in Vivaldi Mail unread.

When, on second thought, you’re not finished with an email and want to take another look at a later time, you can mark it as unread again. One of the easiest ways to do it, especially if you used a Keyboard Shortcut to mark the message read in the first place, is by pressing Shift + K on your keyboard.

But of course, there are other ways you can do it as well. Here are all the ways you can mark a message unread in Vivaldi Mail:

  • Click on the Mark message as unread Mark Unread button in the message toolbar above the message.
  • Right-click on the message in the message list and select Mark Unread.
  • Use the Keyboard Shortcut Shift+K. To mark the whole message thread unread, press Shift + M.
  • Type “Mark Messages as Unread” in Quick Commands.
  • Create a Mouse Gesture for the action.