Tip #82

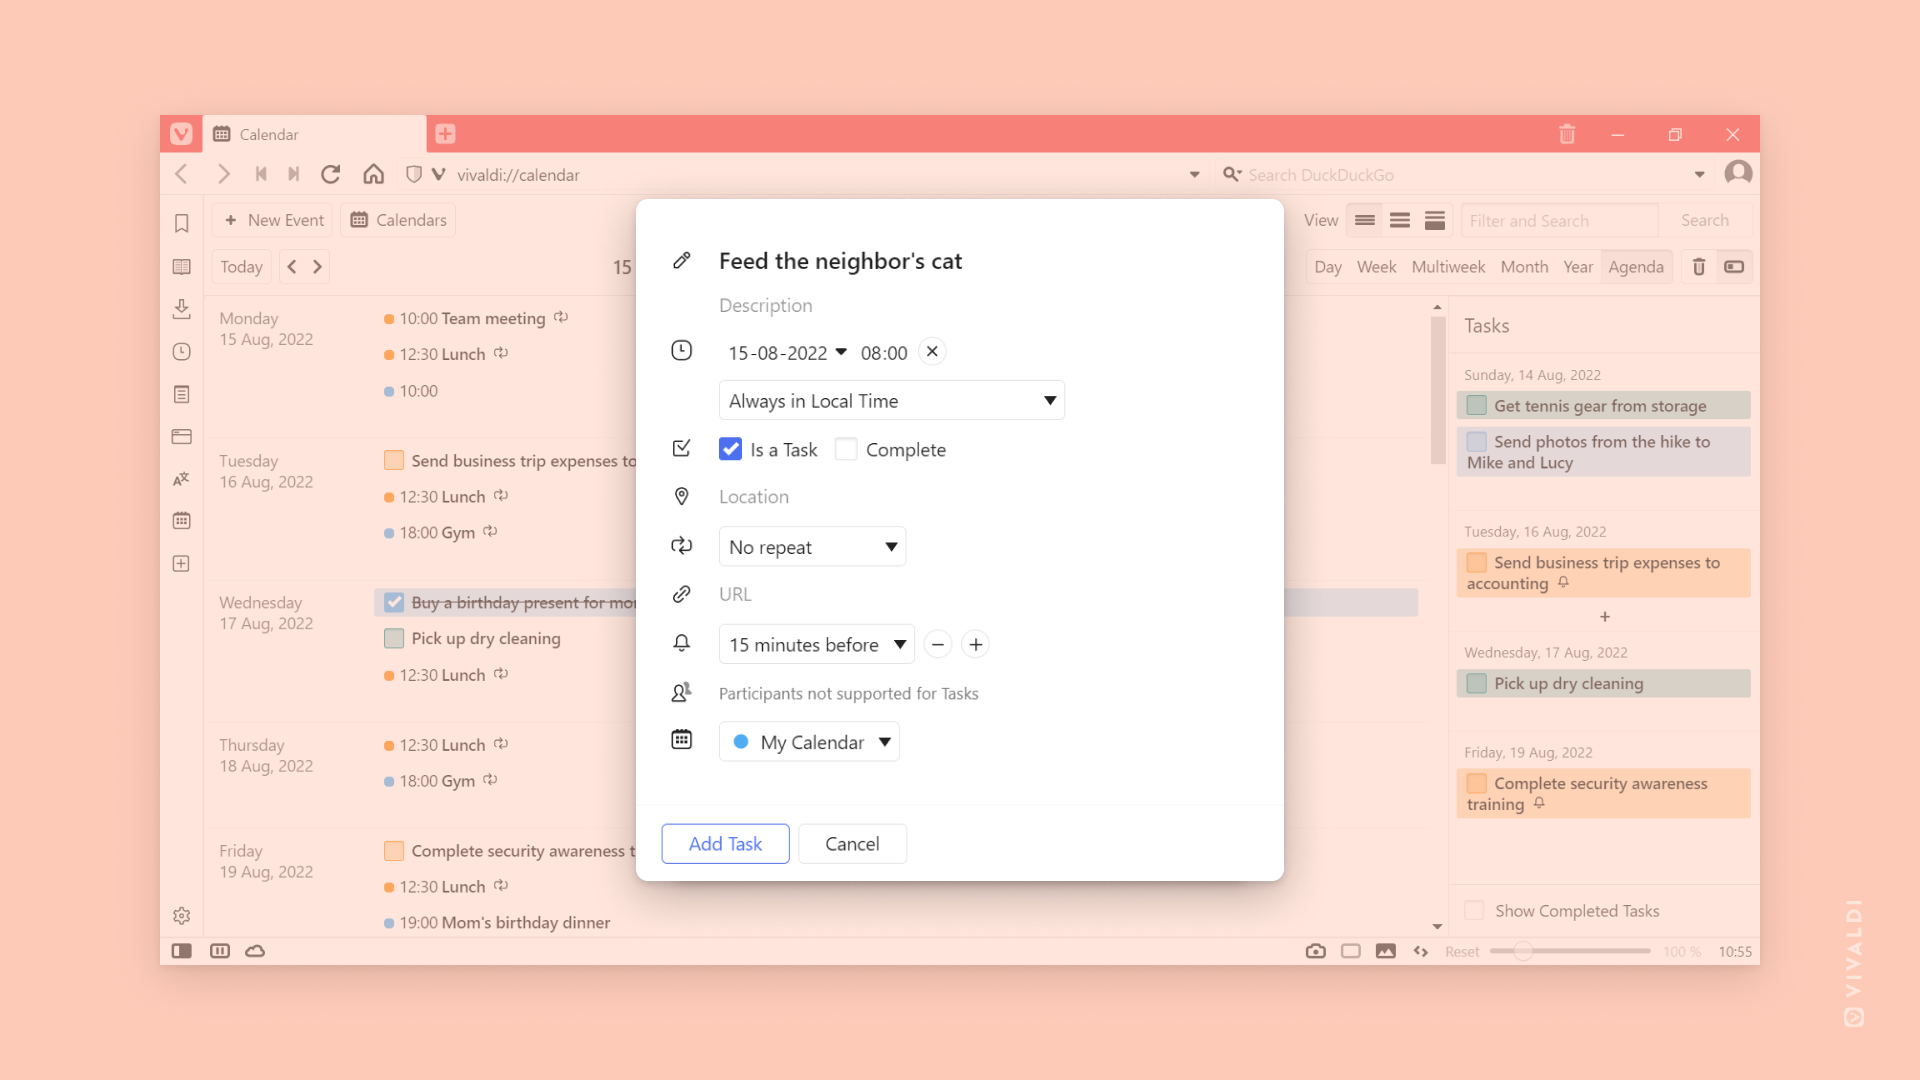
Stay organized by adding tasks to the Calendar.

Vivaldi Calendar can easily be used to keep track of your to-do list. Tasks with deadlines will be shown on their due date among your other events. All tasks, including ones with a deadline, can be seen in the Agenda view.

To create a new task in the Vivaldi Calendar:

  1. Start creating an event by clicking on any timeslot in the calendar or on New Event in the top left corner of the Calendar page.
  2. Enter the task’s details.
  3. Tick the box for Is a Task.
  4. If the task needs to be completed by a certain time, give the task a deadline.

Tip #81

Set your preferred commands for Rocker Gestures.

Rocker Gestures are Mouse Gestures used to execute commands with the left and right mouse buttons.

To perform an action using Rocker Gestures, you have two options:

  • Rock to the right – hold down the left mouse button, then click the right mouse button.
  • Rock to the left – hold down the right mouse button, then click the left mouse button.

To edit Rocker Gestures:

  1. Go to Settings > Mouse > Rocker Gestures.
  2. Select a command from the list of available actions. Once you’ve opened the list, you can also type the name of the command to find it faster.

Tip #80

Use an external download manager to download files on Android.

If you need a bit more control over your downloads, instead of the built-in downloader, you can opt for an external download manager app.

To set an external app to manage your downloads:

  1. Install an external download manager of your choice.
  2. In Vivaldi, go to Vivaldi menu > Settings > Web Pages > Downloads > External Download Manager.
  3. Select the app you want to manage your downloads with.

Then whenever downloading a file the external app will take over.

Tip #79

Choose how long you want to keep your browsing history for.

Whether you like to keep a record of websites you’ve visited indefinitely or delete everything once you’re done browsing, you have options in Vivaldi.

To change for how long your browsing History is kept for:

  1. Go to Settings > Privacy and Security > Privacy > Save Browsing History.
  2. Select your preferred option:
    • Session only,
    • One Day,
    • One Week,
    • One Months,
    • Three Months (default),
    • Six Months,
    • One Year,
    • Forever.
  3. Restart the browser.

Tip #78

Synchronize your browser data to access open tabs on other devices.

If you browse with Vivaldi on multiple devices, then by using the Sync feature, you can continue browsing seamlessly when switching devices.

To be able to access tabs you have open on other devices:

  1. Go to the Vivaldi menu > Settings > Sync.
  2. Log in to your Vivaldi account.
  3. Enter the encryption password.
  4. Sync all or select the data types you want to sync, but make sure to enable syncing of History.

To open synced tabs on desktop:

  1. Click on the cloud icon on the right side of the Tab Bar (bottom, if you’re using a vertical Tab Bar).
  2. Select the synced device.
  3. In the list of synced tabs, click on the web page you want to open.

To open synced tabs on Android:

  1. Open the Tab Switcher.
  2. Tap on the cloud icon on the menu at the bottom of the screen.
  3. In the list of synced tabs, tap on the web page you want to open.

Learn more about Sync:

Tip #77

Display the main application menu horizontally on the top edge of the browser window.

On macOS, Vivaldi’s main menu is always fully visible. On Windows and Linux, by default, the main menu can be accessed by clicking on the little Vivaldi logo in the top left corner of the window. But it can also be displayed in full on the top edge of the browser window.

To display the horizontal menu:

  1. Go to Settings > Appearance > Menu > Menu position.
  2. Select Horizontal.

Alternatively, toggle horizontal menu’s visibility from Vivaldi menu > View > Horizontal Main Menu.

Sections of the browser window displaying the main menu both as a button and horizontally.
Top: Vivaldi button menu. Bottom: Horizontal menu

Tip #76

Right-click on the Bookmark Bar to manage the bookmarks on it.

Clicking on a bookmark, bookmark folder or empty space on the Bookmark Bar with the right mouse button will open a menu with various useful options.

Depending on where you click, the menu options you see may include the following:

  • Where to open the bookmarked link. For example, in a new tab or a window.
  • Option to add the active tab as a new bookmark on the Bookmark Bar.
  • Manually create a new bookmark, bookmark folder or a separator for segmenting the Bookmark Bar.
  • Edit the bookmark or bookmark folder.
  • Cut (to move a bookmark), Copy (to make a copy of the bookmark or copy the link) and Paste (to move a bookmark or create a new bookmark from a copied link).
  • Delete the bookmark or bookmark folder.
  • Sort the bookmarks (only available, when clicking on an empty area of the Bookmark Bar).

Tip #75

Create filters in Vivaldi Webmail to automatically organize your incoming messages.

If you receive a lot of messages, it helps to automate some of the organizational work. Creating Filters is a good way to move incoming messages to a different folder, add flags to them, reply with a predefined message and more.

To create Filters in Vivaldi Webmail:

  1. Log in to your Vivaldi account on webmail.vivaldi.net.
  2. Go to Settings > Filters.
  3. Click on Create on the top edge of the page, towards the right side.
  4. Give the filter a name, create the rule and set the action to be applied.
  5. Click Save.

On the screenshot below, you can see an example of a filter that moves messages containing the words “[Book Club]” in the subject to a folder titled Book Club.

Tip #74

Add a new custom Search Engine to Vivaldi from the site search field’s context menu.

Adding a new Search Engine to Vivaldi lets you get to the site’s search results without needing to navigate to the page first. To add a new custom Search Engine:

  1. Go to the website where you often use the site’s search feature.
  2. Right-click on the search field.
  3. Select Add as Search Engine from the context menu.
  4. Review and, if needed, edit the name and nickname.
  5. Click Add.

To search with your new Search Engine, type its nickname before the search term in the Address Field or select it from the Search Field’s dropdown menu.